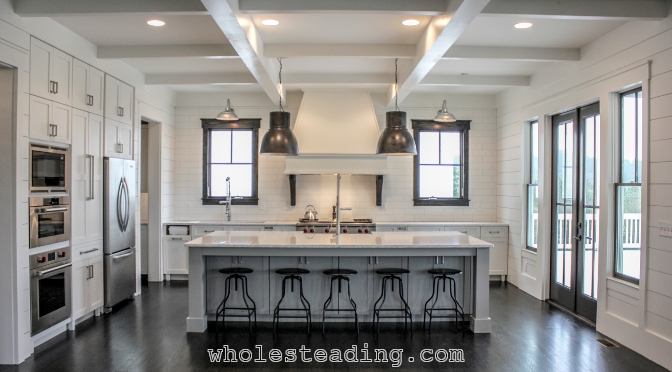
As many of you know from our “Designing Kitchen and Cabinet Layouts” post, our whole house was designed around Bethany’s dream kitchen. While we made every effort to save money on other areas of the house, we were much less frugal when it came to the kitchen. Because we are so thrilled with both the aesthetic and functional results, I wanted to take the time to share pictures and explain in detail why Bethany loves her dream kitchen design so much!
This kitchen design is not one that happened by accident. Bethany slaved over the design for many months and mocked up every version and every detail using Home Designer Architectural software. Here is a screenshot Bethany took using the software and then what the kitchen looks like now in real life:
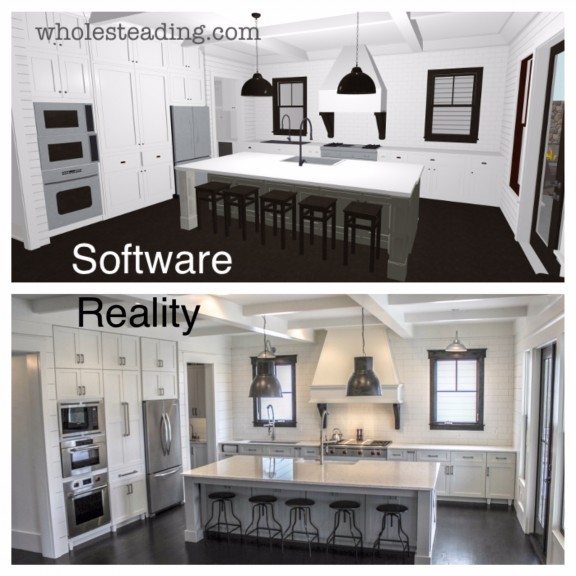
As you can see, the software provided Bethany the flexibility and features required to accurately envision what the design would look like in real life. Bethany is not a professional designer and had never used the software before…a real testament to how easy Home Designer Architectural was to use.
Bethany loves the way the kitchen turned out aesthetically. However, what she really appreciates about the kitchen are the functional elements that make cooking for our large family easy and fun!
Here is a list of some of the unique things that Bethany thought of that make this dream kitchen design so practical:
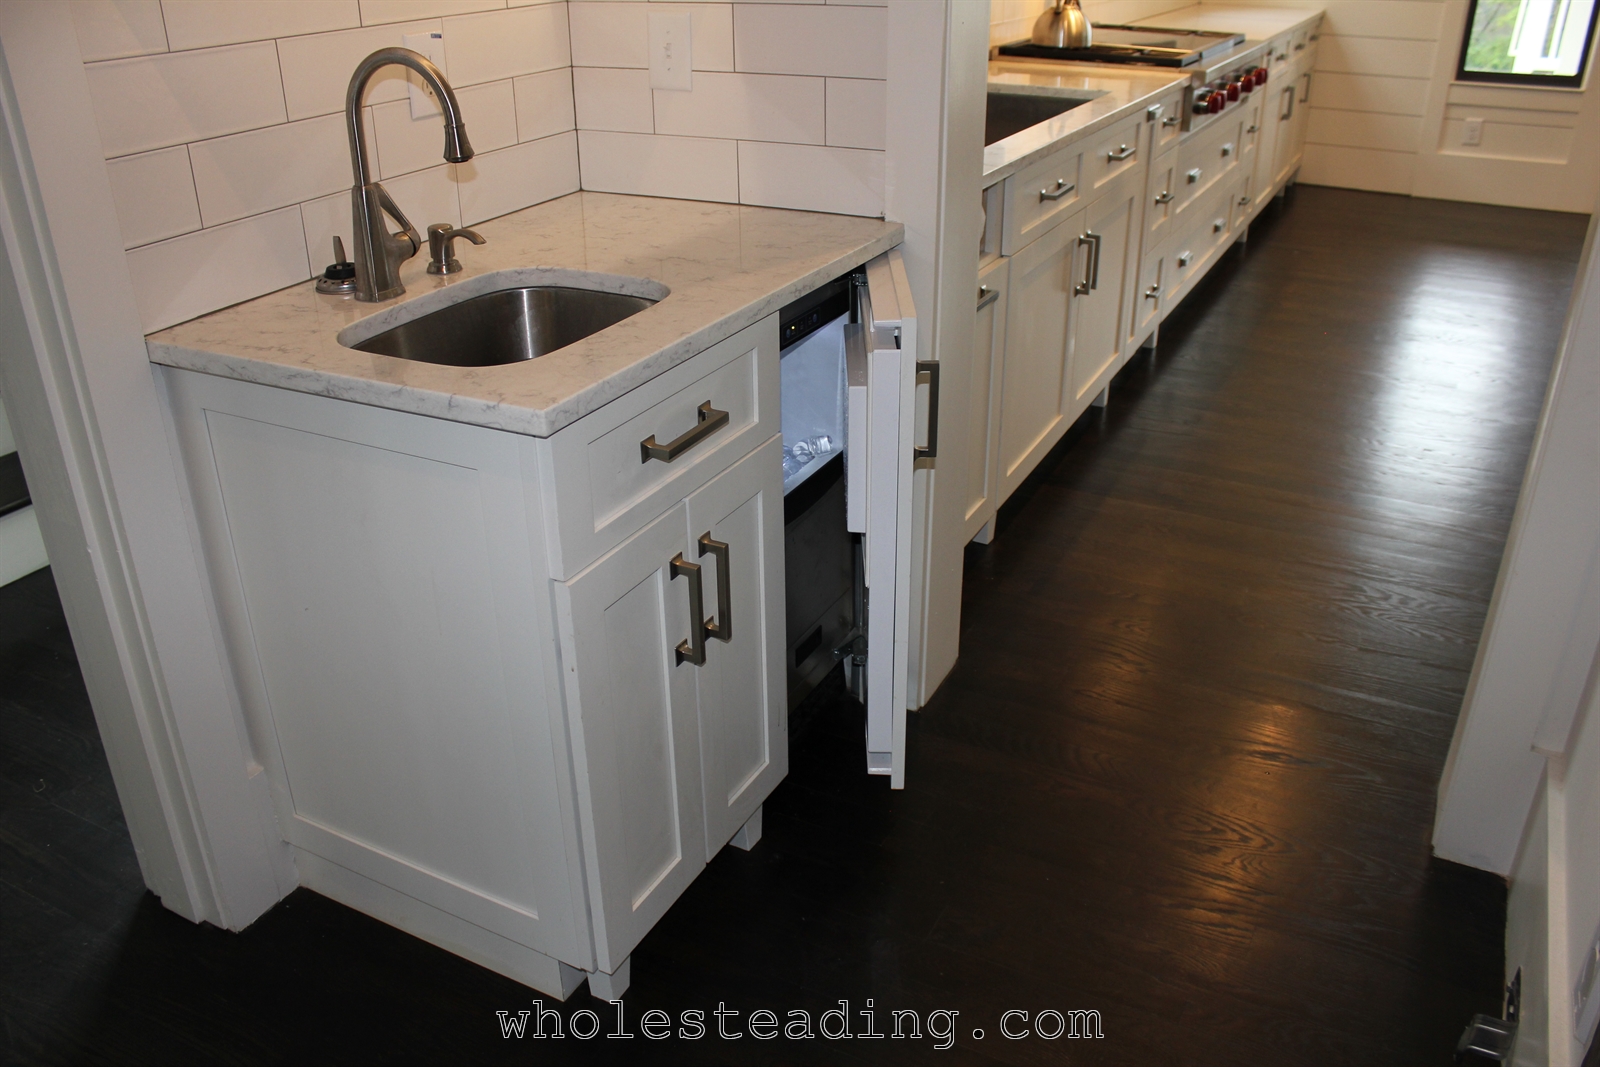
Two dishwashers – Our family is quite large so most meals produce more dishes than a single dishwasher can handle. Previously, we had one dishwasher and there would frequently be a stack of dishes leftover waiting for the first load to finish. Dishwashers are not particularly expensive so we decided to just go ahead and install two – one on each side of the sink – far enough apart that multiple people doing dishes wouldn’t get in the way of each other. The buttons for the dishwashers are on top of the doors and are hidden when the doors are closed:
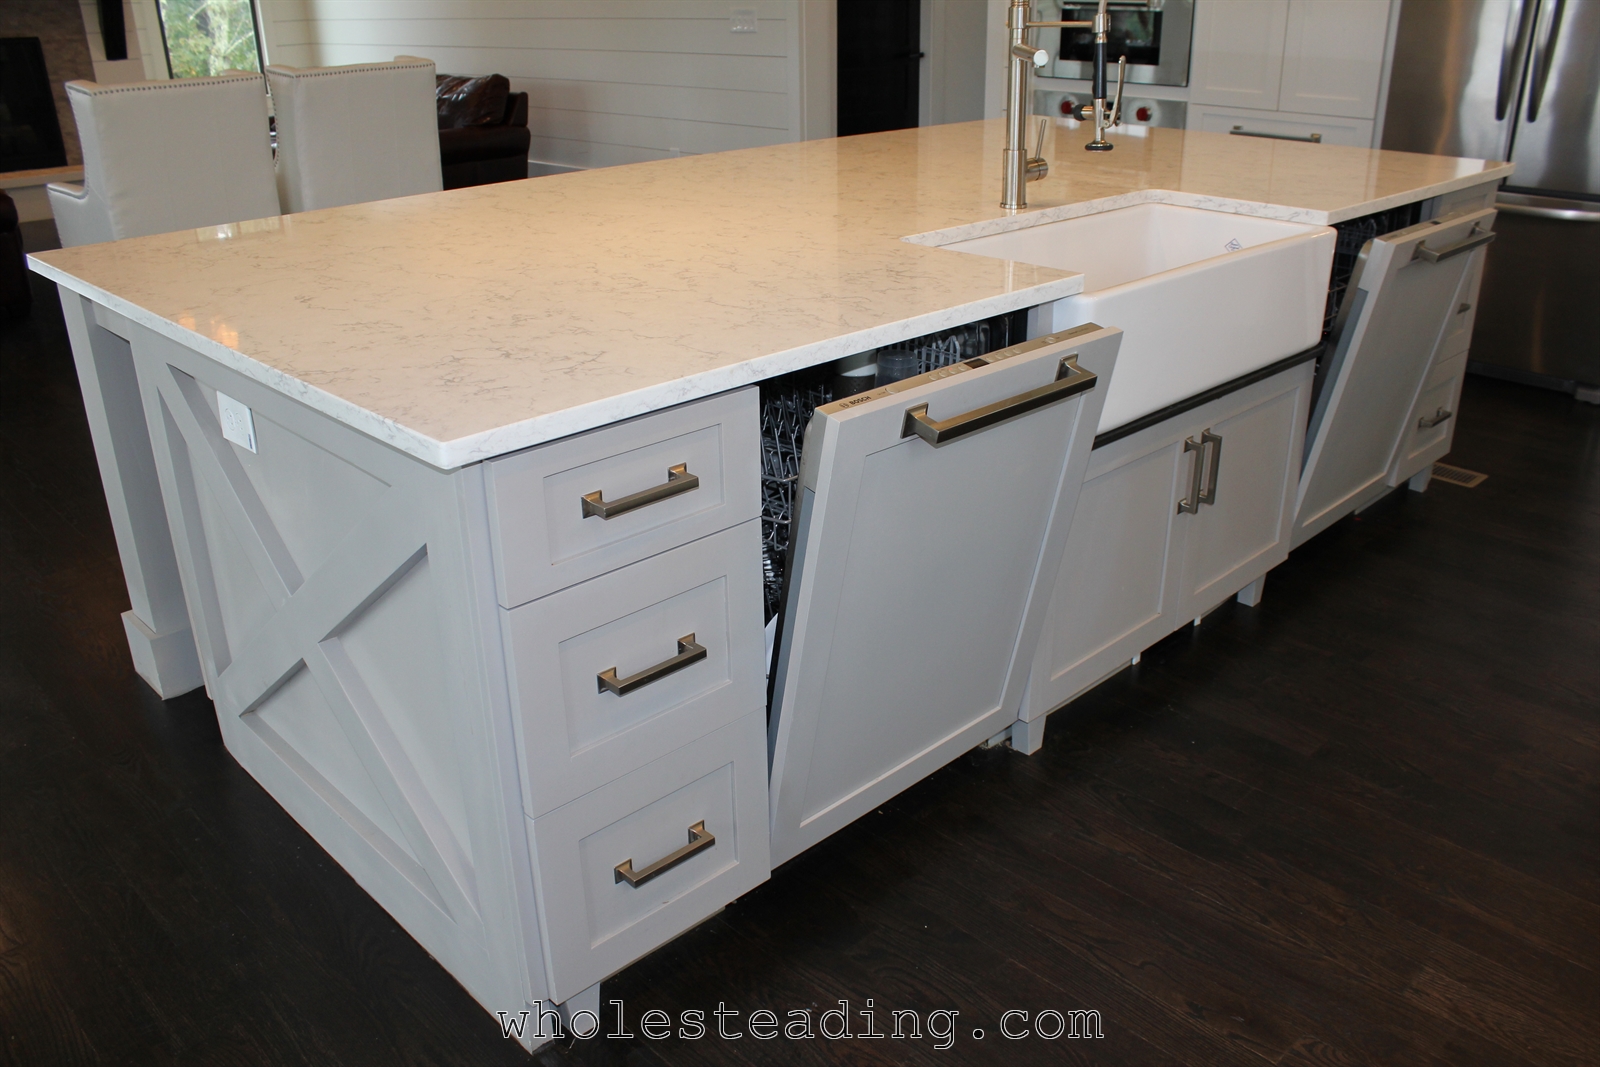
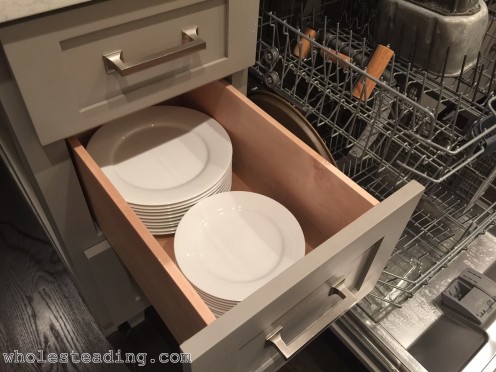
Additionally, she planned ahead so that the drawers directly next to the dishwasher would house the items that we use most frequently. That way, most dishes and flatware can be put away in a snap.
Panel-Ready Appliances – An important aspect of Bethany’s design was that there be nothing on the counters and that everything look clean and organized. We thought it would be nice to “hide” the dishwashers by choosing panel-ready models. Here is what the dishwashers look like when they are closed:
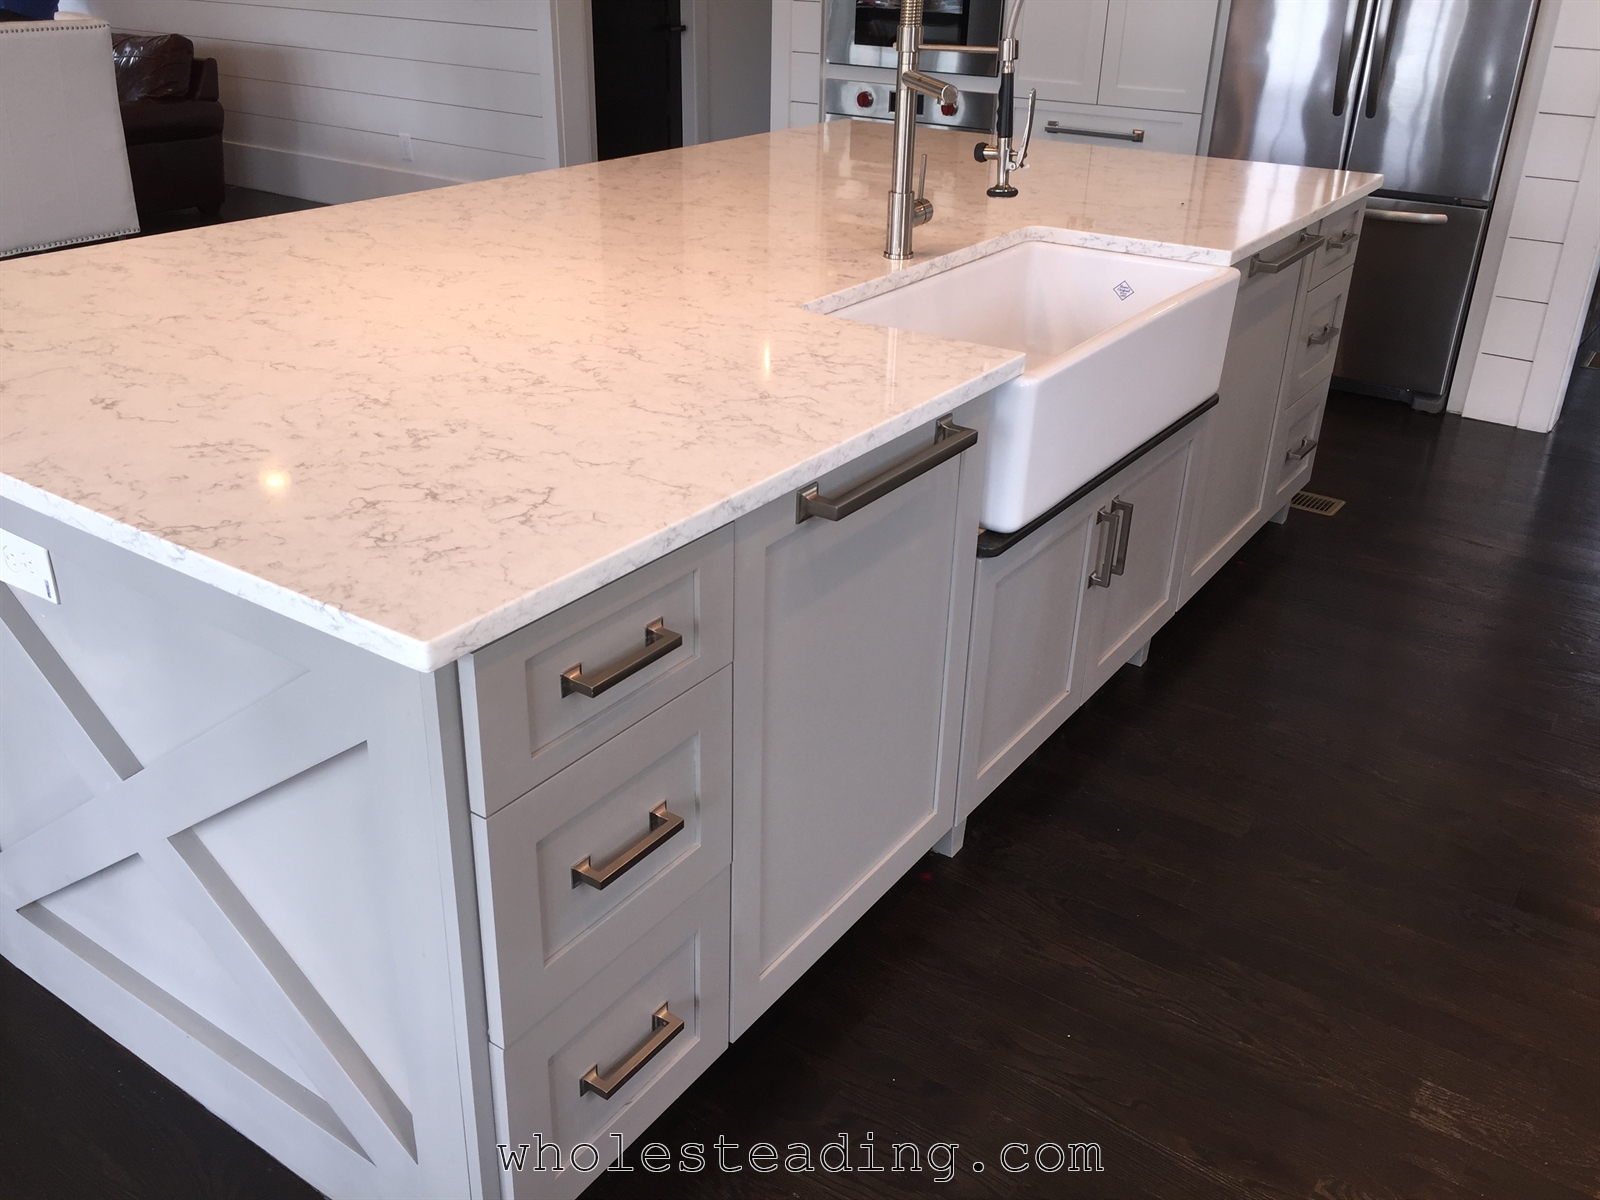
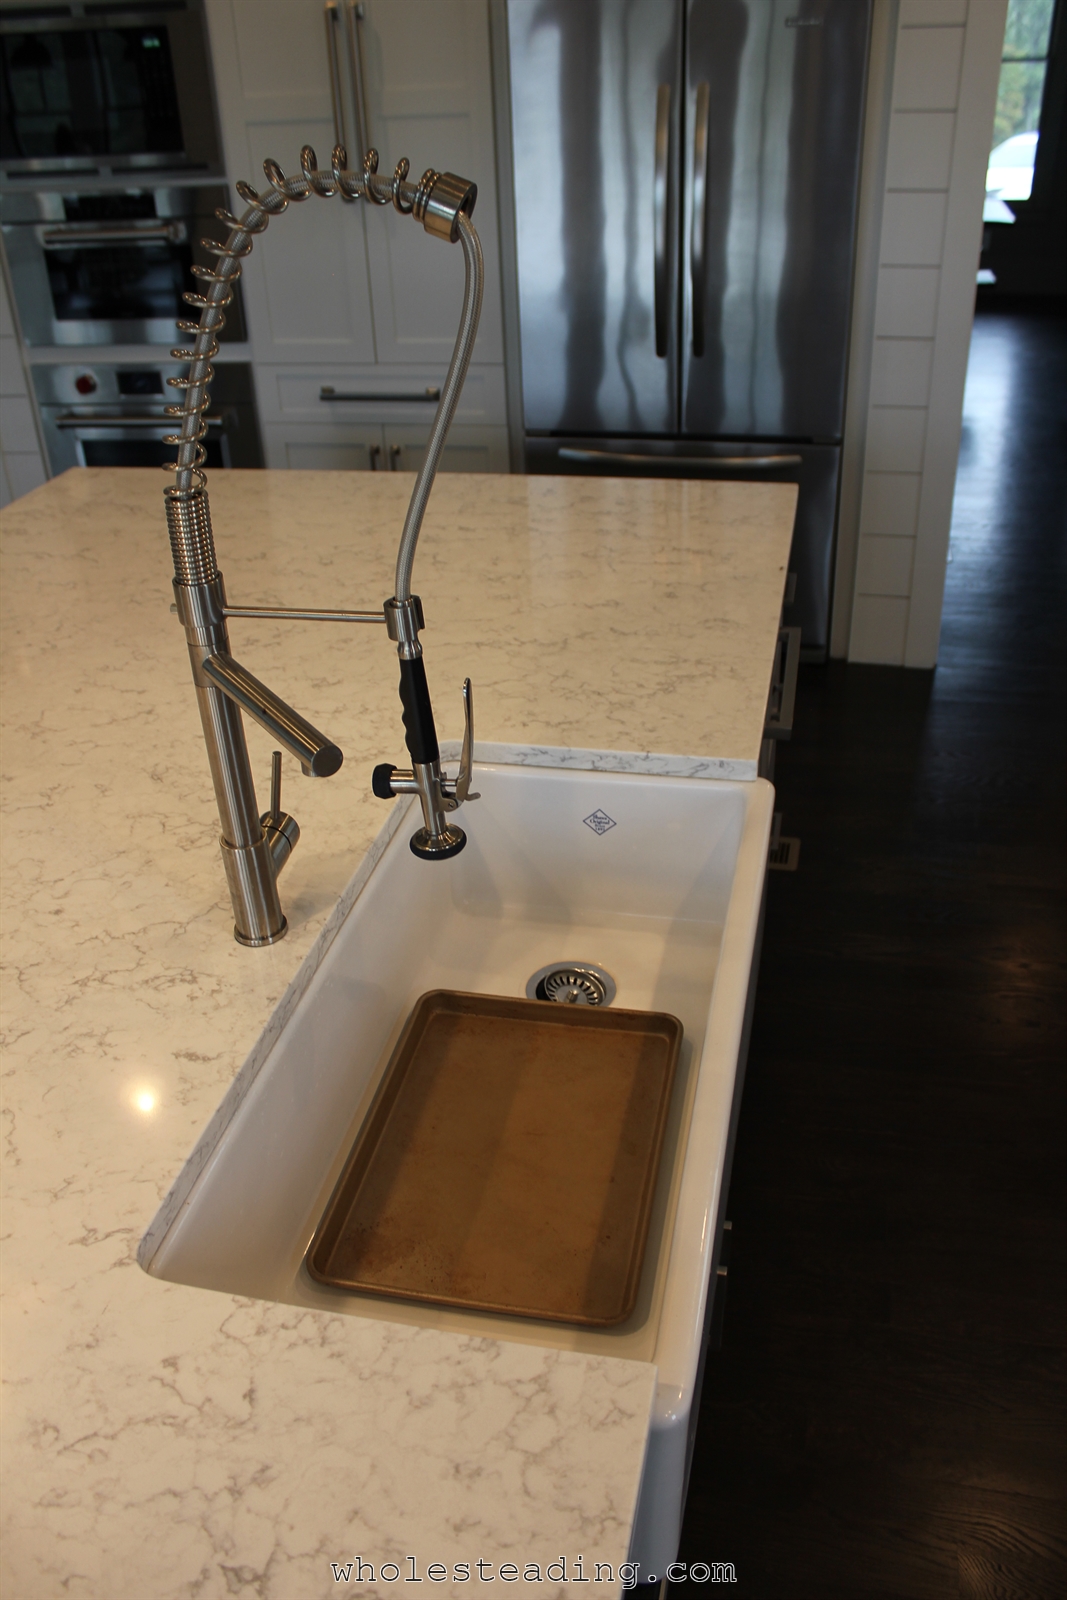
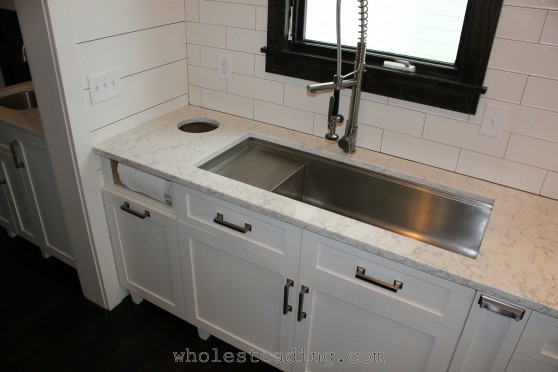
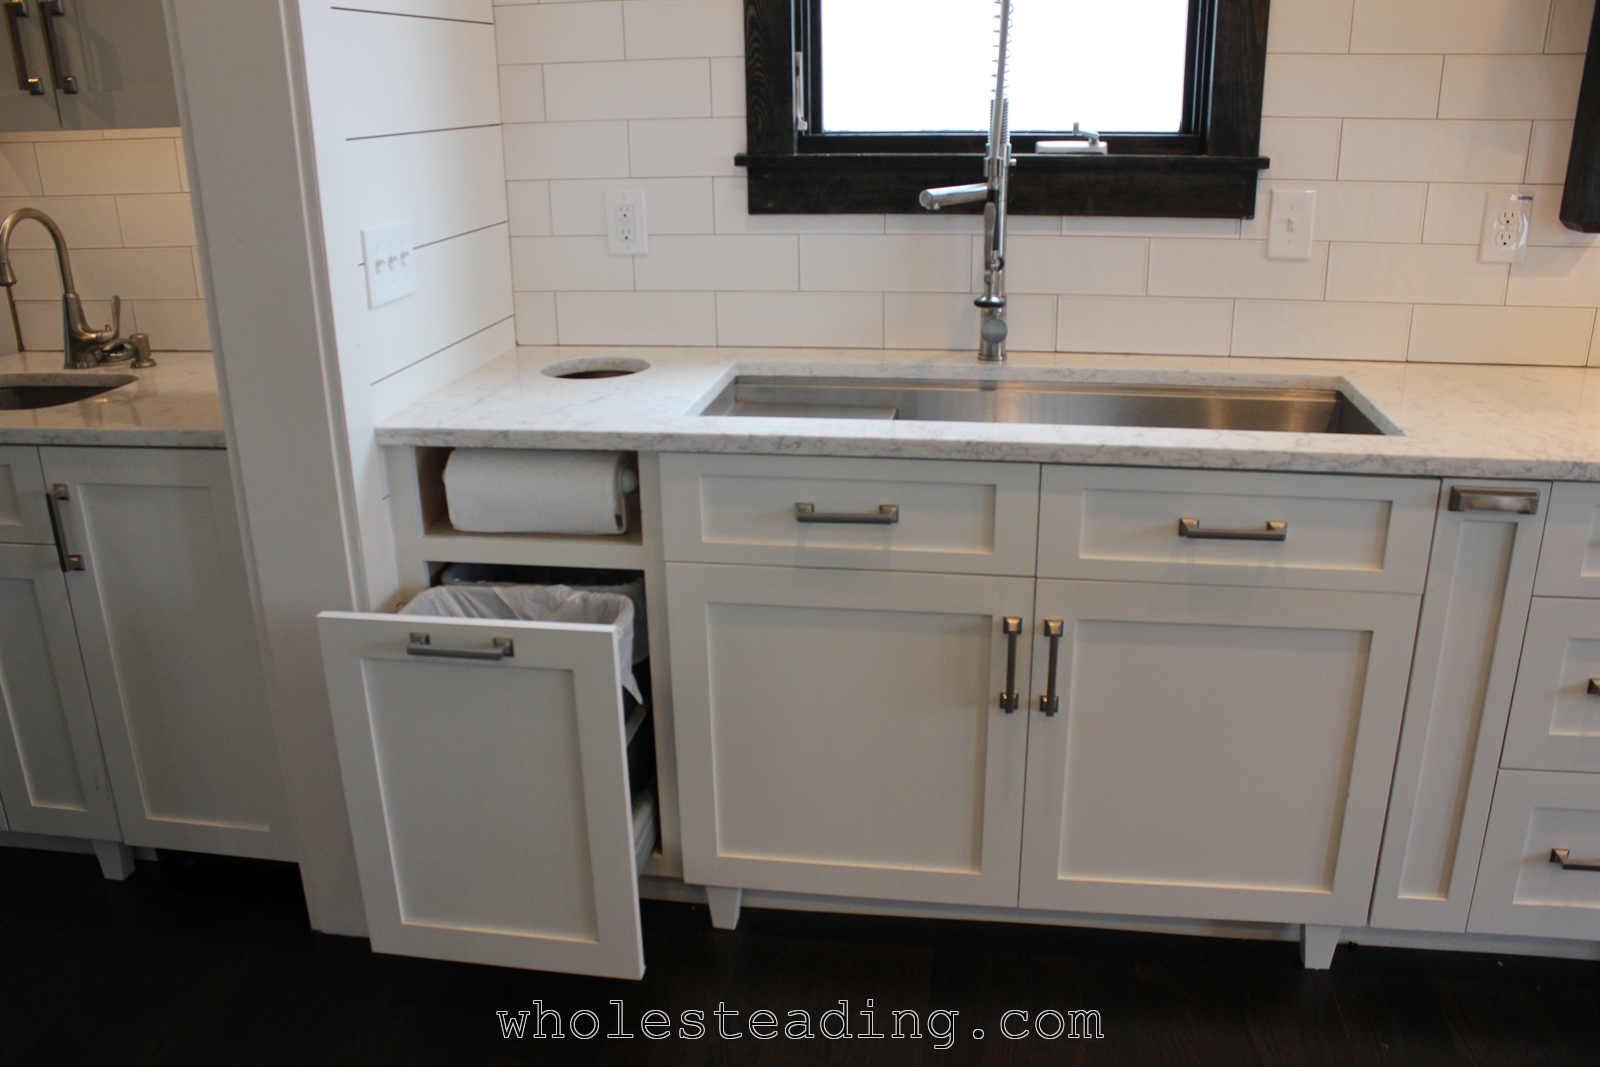
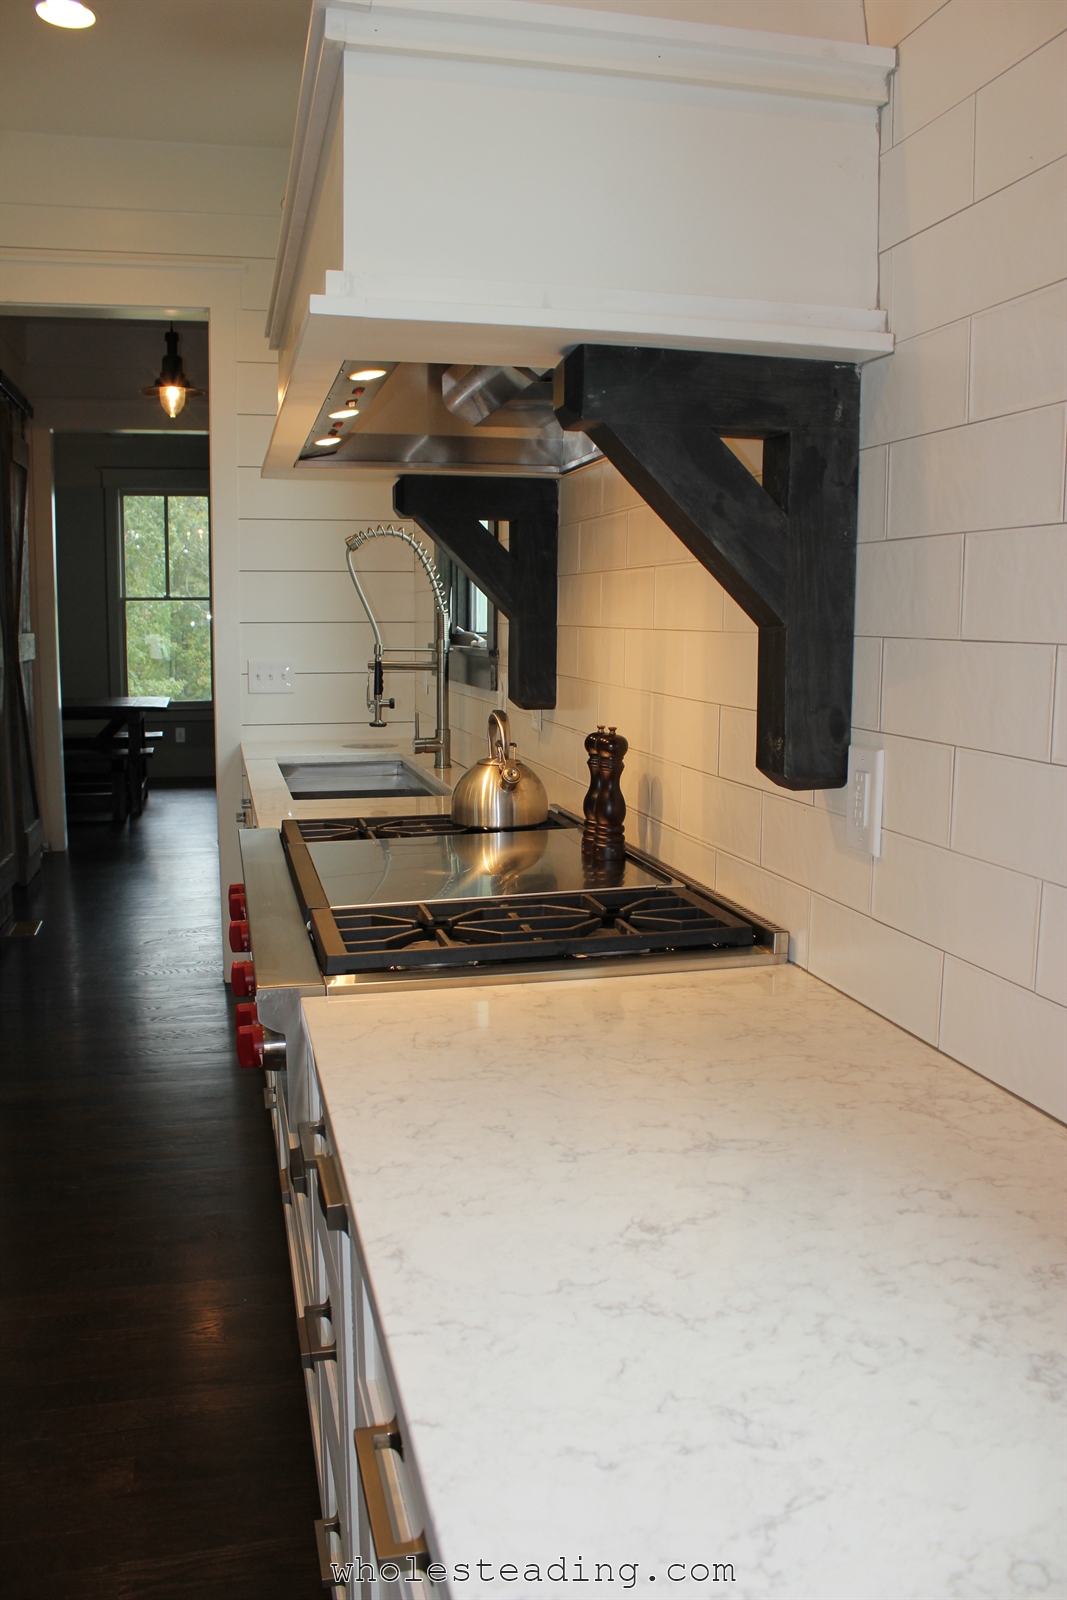
Large and Deep Kitchen Sink With Commercial Faucet – One of Bethany’s biggest frustrations in previous kitchens was that she couldn’t stick an entire baking sheet in the sink and soak all of it at the same time. That issue was resolved by selecting a deep farmhouse basin sink. She chose the Rohl Shaw Fireclay model that is a full 36 inches wide and 18 inches deep. We also chose the Kraus kitchen faucet with commercial pre-rinse features. What a huge difference this has made! Here is a picture of a full-sized baking pan laying in the bottom of the sink for reference:
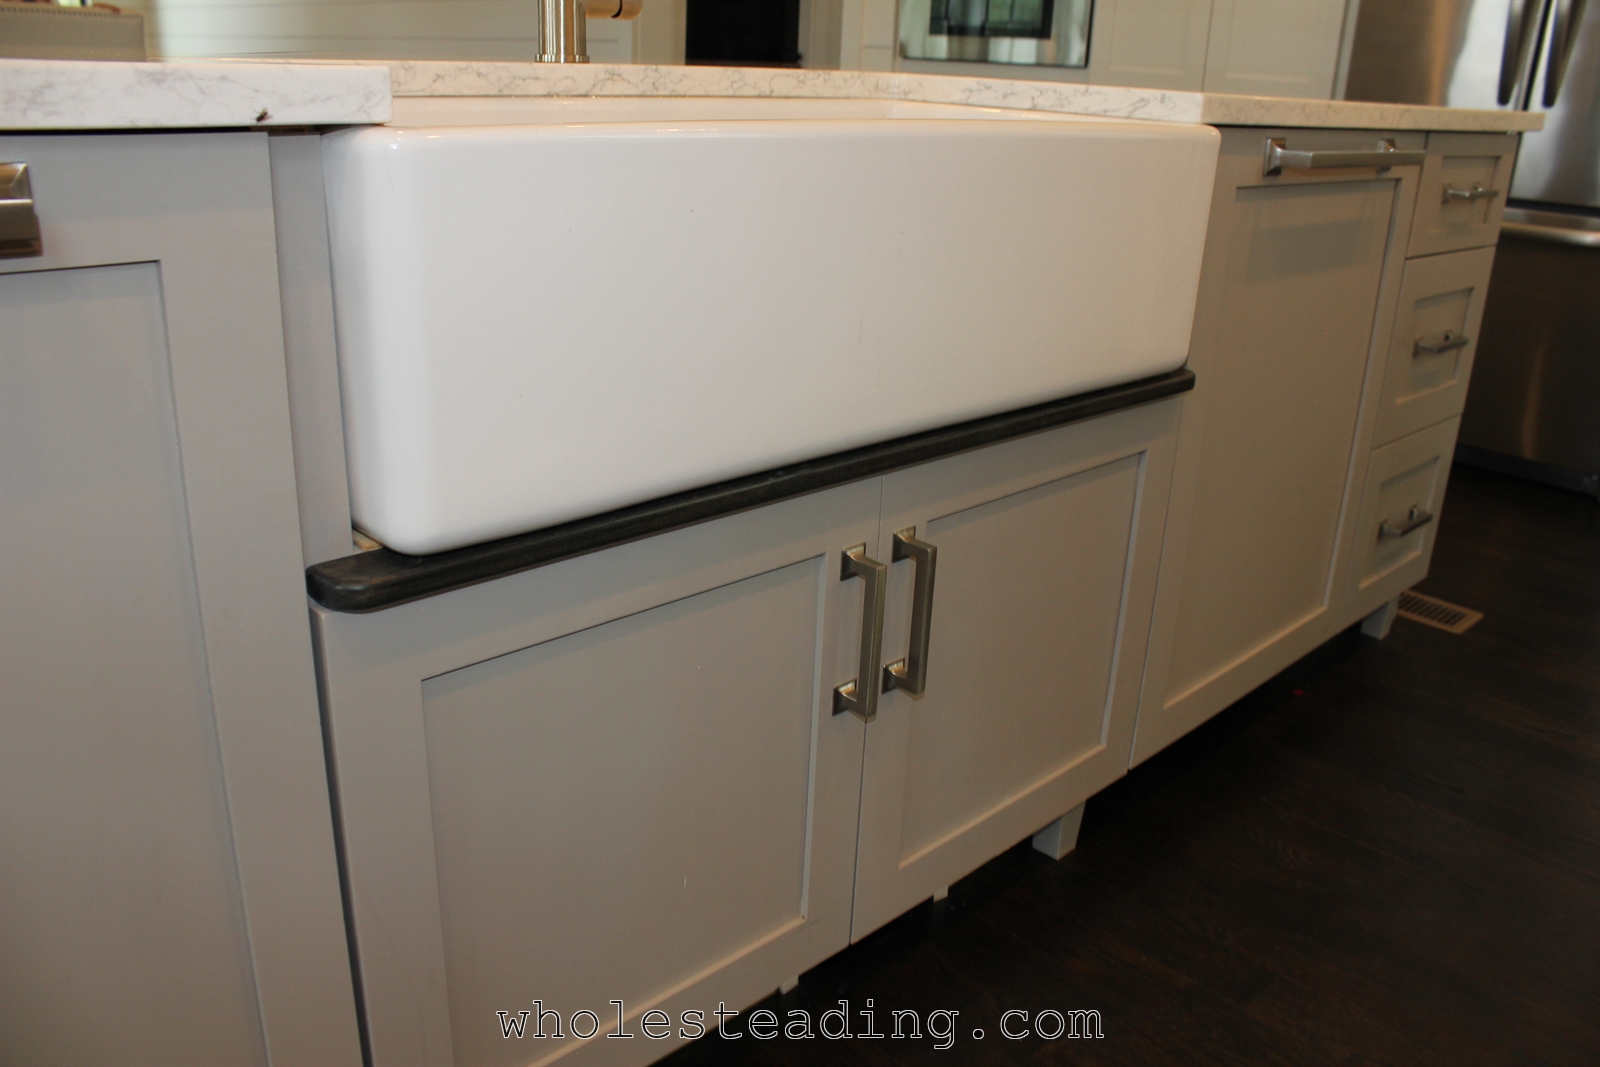
Our cabinet installer, Joe Gavalas with Marilynn Enterprises, added a nice accent trim piece under the sink:
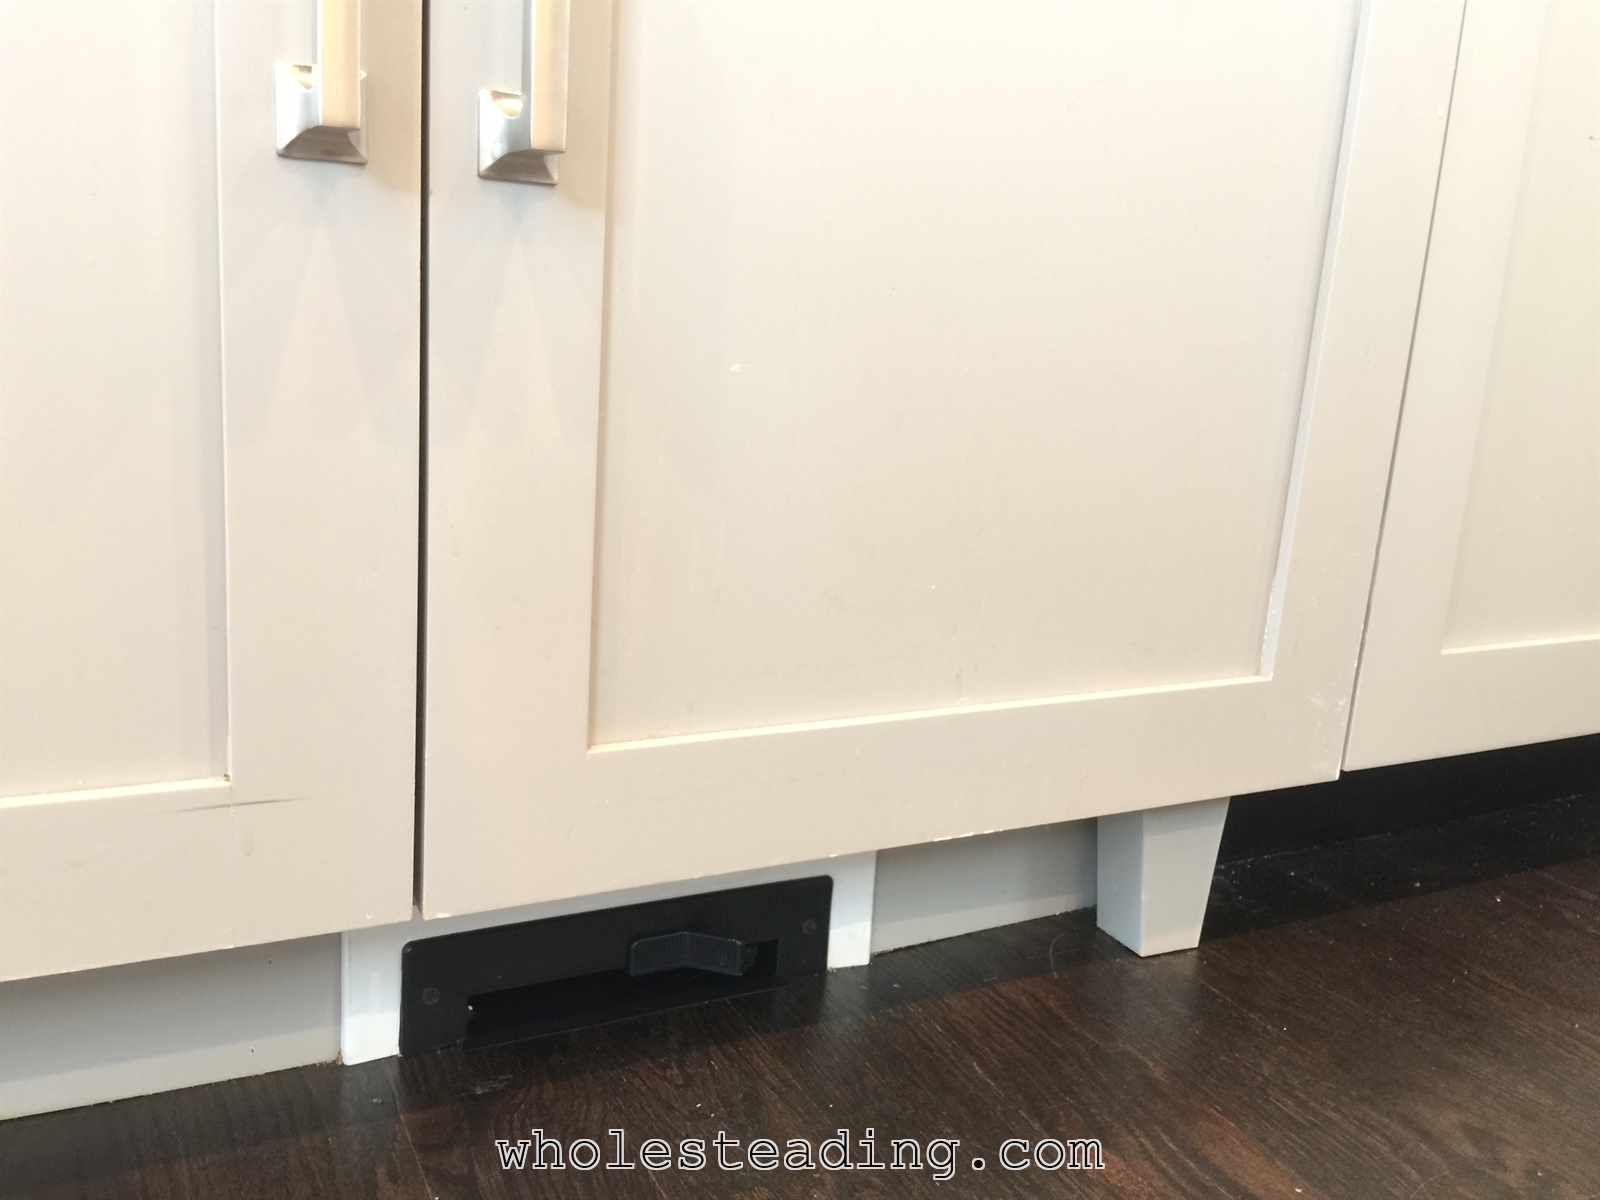
There is also a central vacuum automatic dustpan installed under the main sink. If you haven’t used one of these before, this is how it works: you sweep the mess up in front of the automatic dustpan, you use your foot to activate the vacuum, and all of the debris disappears into the dustpan and makes its way to the central vacuum collector in the basement. Here is what the automatic dustpan, sometimes called a Vacupan or Vacusweep, looks like:
Secondary Prep-Sink – Another thing Bethany observed in past kitchens is that the main kitchen sink frequently was used for disgusting clean-up jobs and it was also sometimes filled with dirty dishes. She wanted to have a sink that was dedicated to food prep and that never had dishes stacked in it. She wants to always be able to walk into the kitchen and get straight to work on a delicious meal. She ended up selecting the Kohler Stage 45″ Prep Sink…the Rolls Royce of prep sinks:
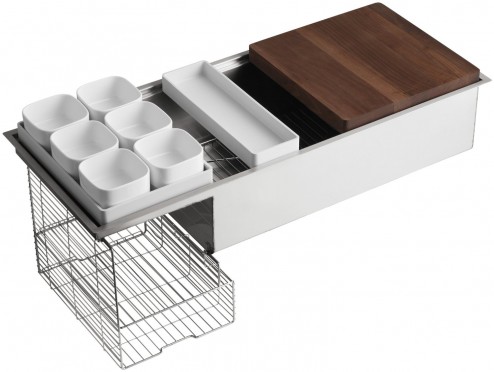 Here is what the Kohler Stages sink looks like installed and without all of the prep station inserts laying on top:
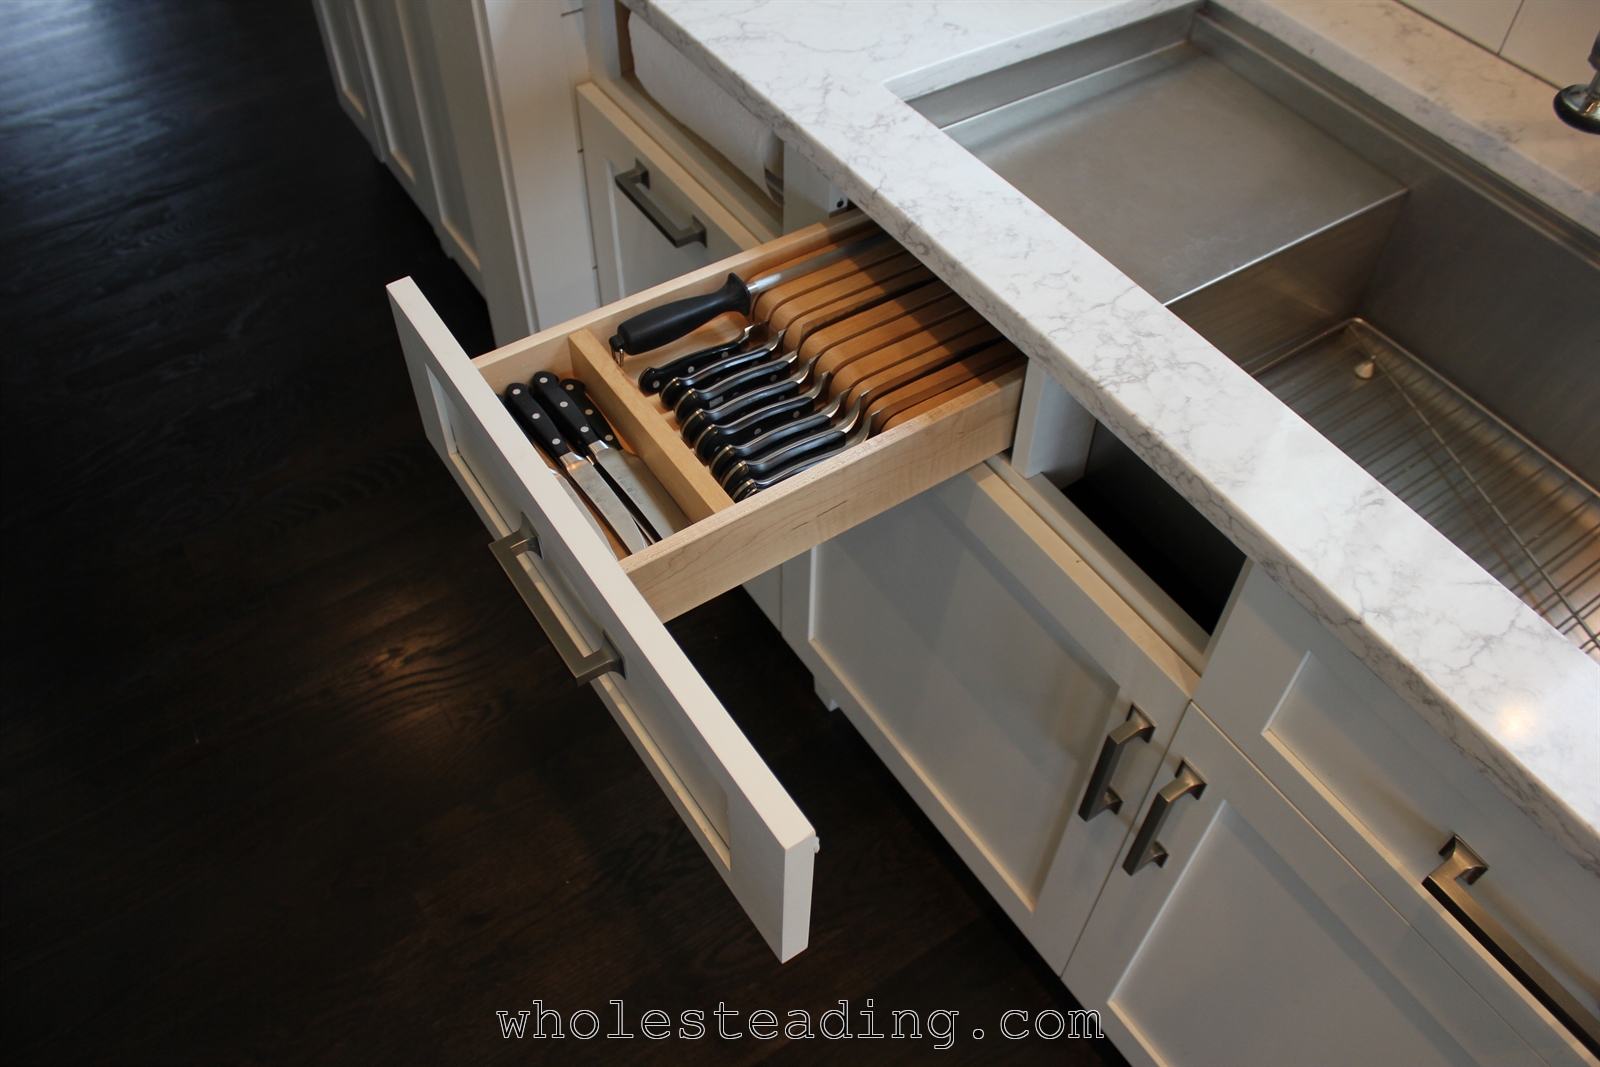
Hidden and Easily Accessible Knife Drawer – In keeping with the desire to keep the countertops clear, Bethany asked Joe if he could install a knife drawer under the prep sink. Here is what he was able to do with the empty space available under the left side of the prep sink:
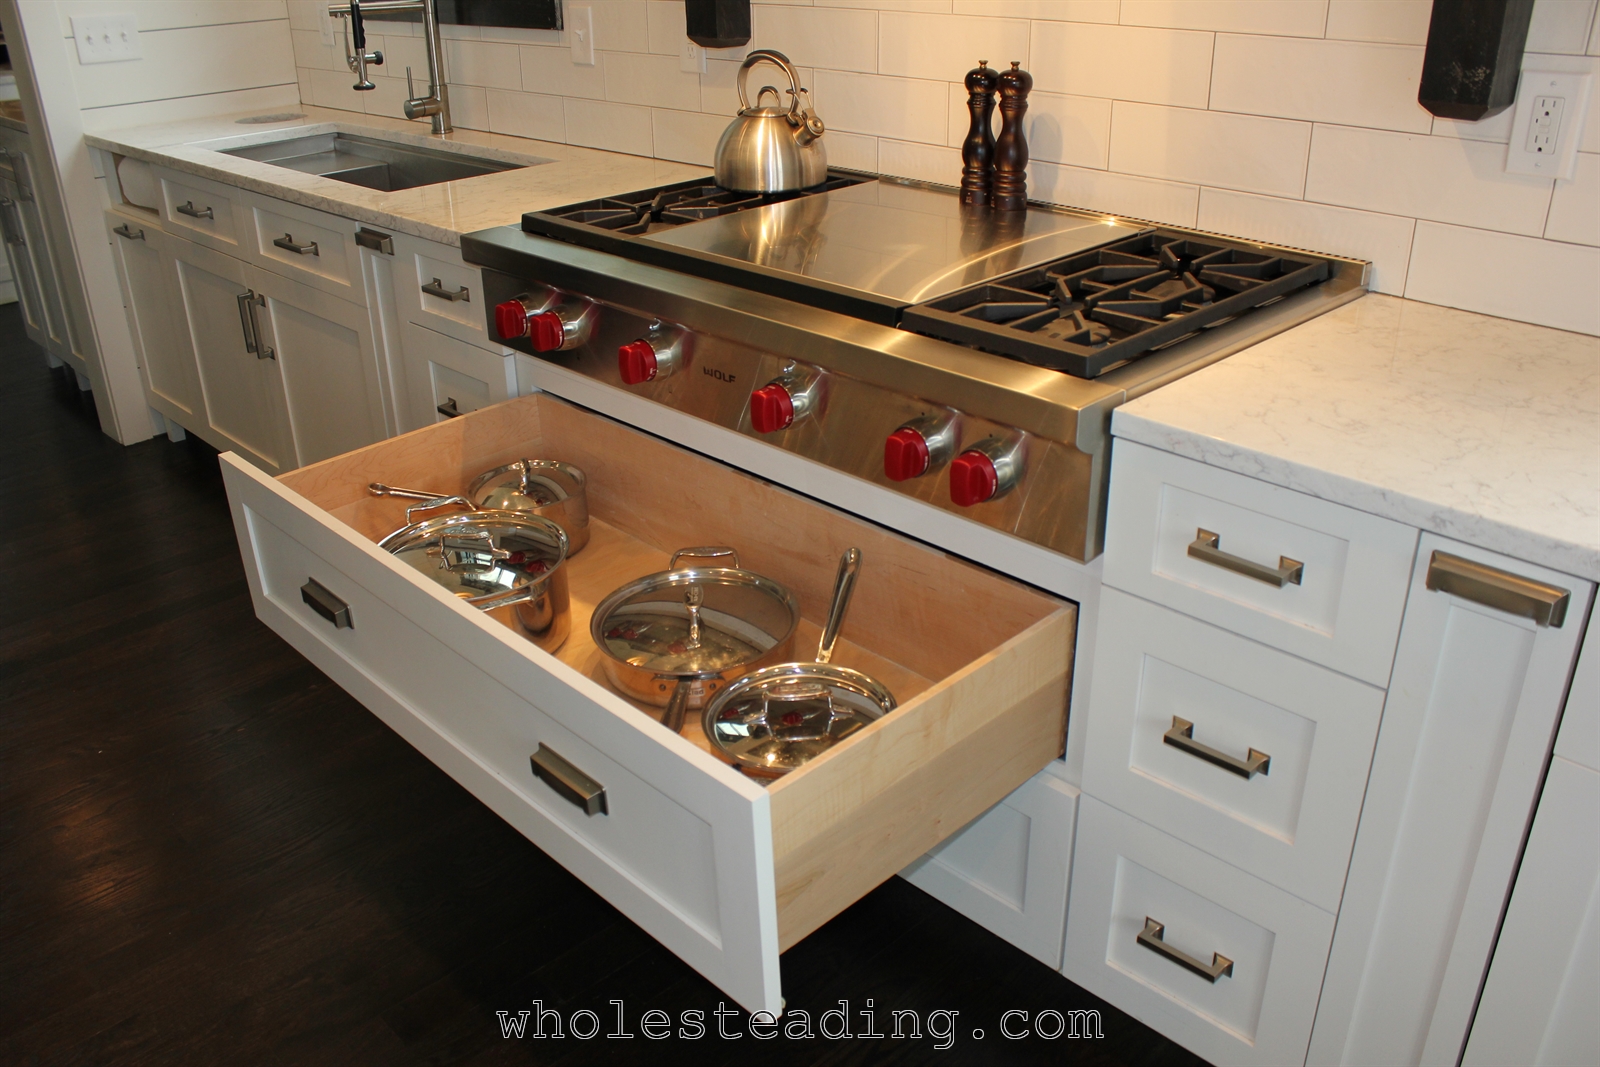
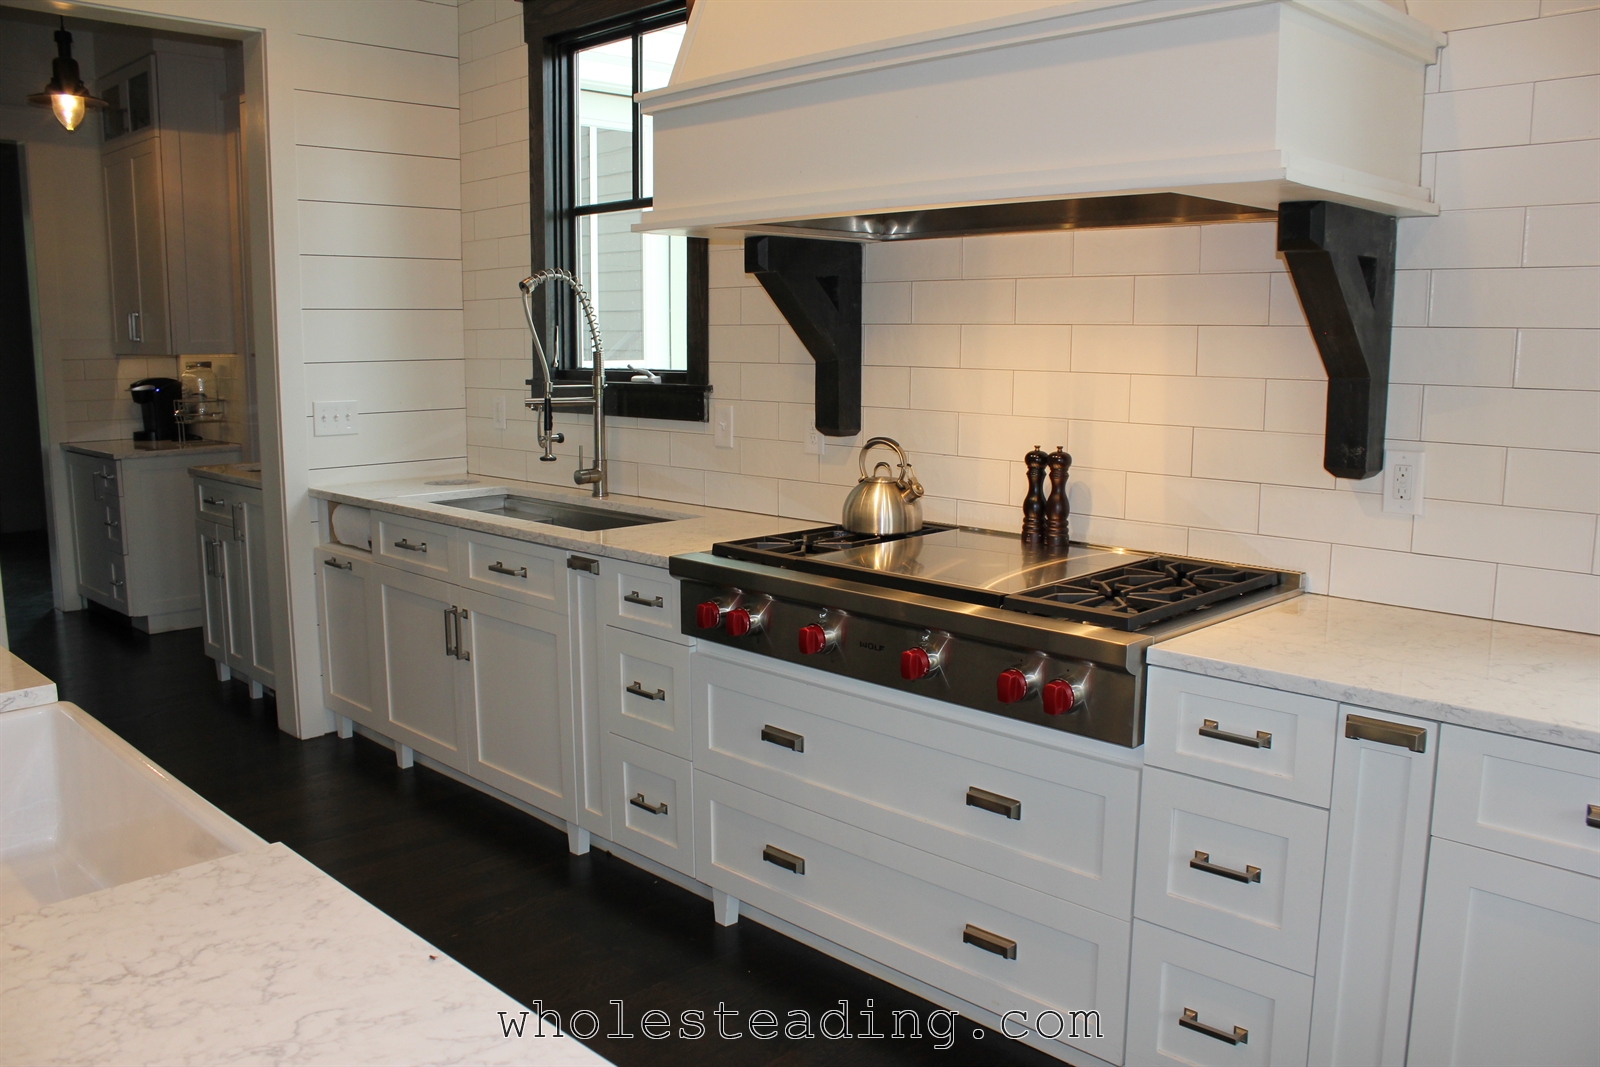
Large Pullout Pots Drawer under Stovetop – While we are focused on drawers we should mention the large drawers under the stovetop. In the past Bethany would make loud frustration sounds as she attempted to get the bottom pot out from underneath a stack of pots and pans all crammed into a cabinet together. Many times the matching lid was missing in action. Her idea for this kitchen was to make it so that each pot could sit by itself (stored with the matching lid ready to go) in a way that it could be used without having to move another pot out of the way first. There are two drawers under the stove top that allow for just that:
Pull-out Utensil Drawers – Bethany has many different utensils she uses while cooking and in the past she always stored them in a container on the countertop. They frequently got caught on each other when trying to pull a certain one out and they were also an eyesore of clutter next to the stove. The utensils are now organized on pull-out racks to either side of the stovetop:

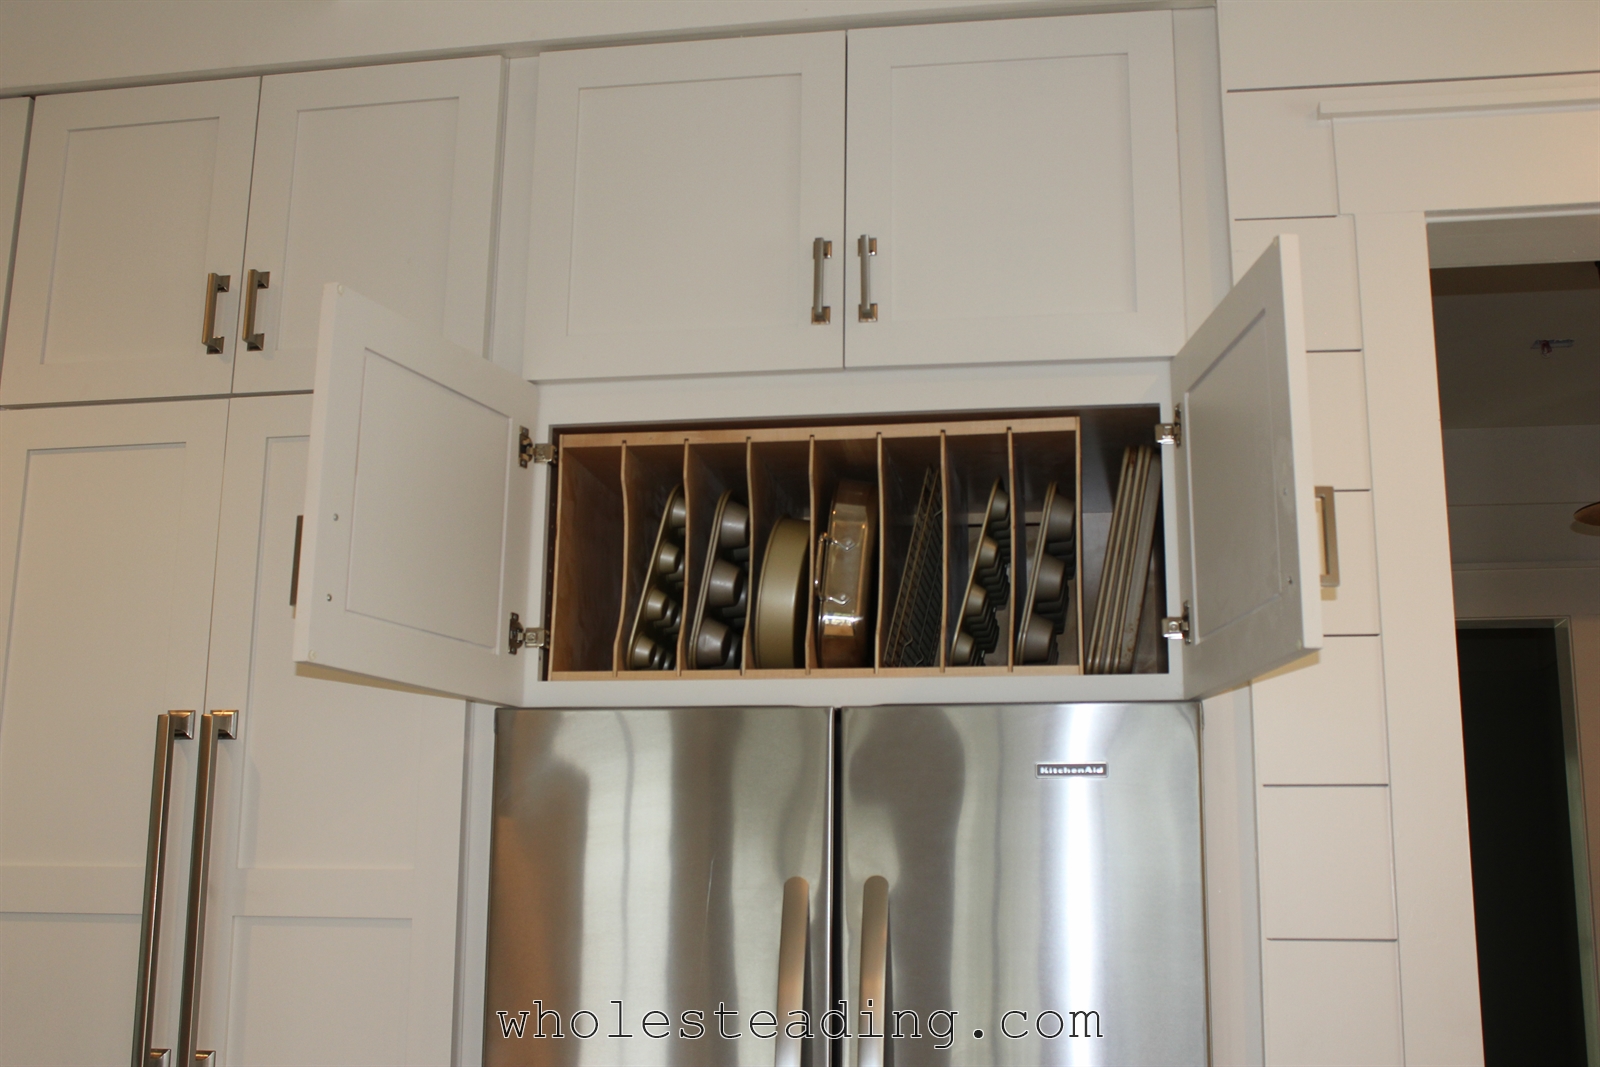
Baking Pan Divider – As you can tell by now, Bethany is very into organization and being able to easily find things when she needs them. Now, instead of baking pans being stacked on top of each other, they are each individually accessible from the baking pan divider area above the refrigerator:
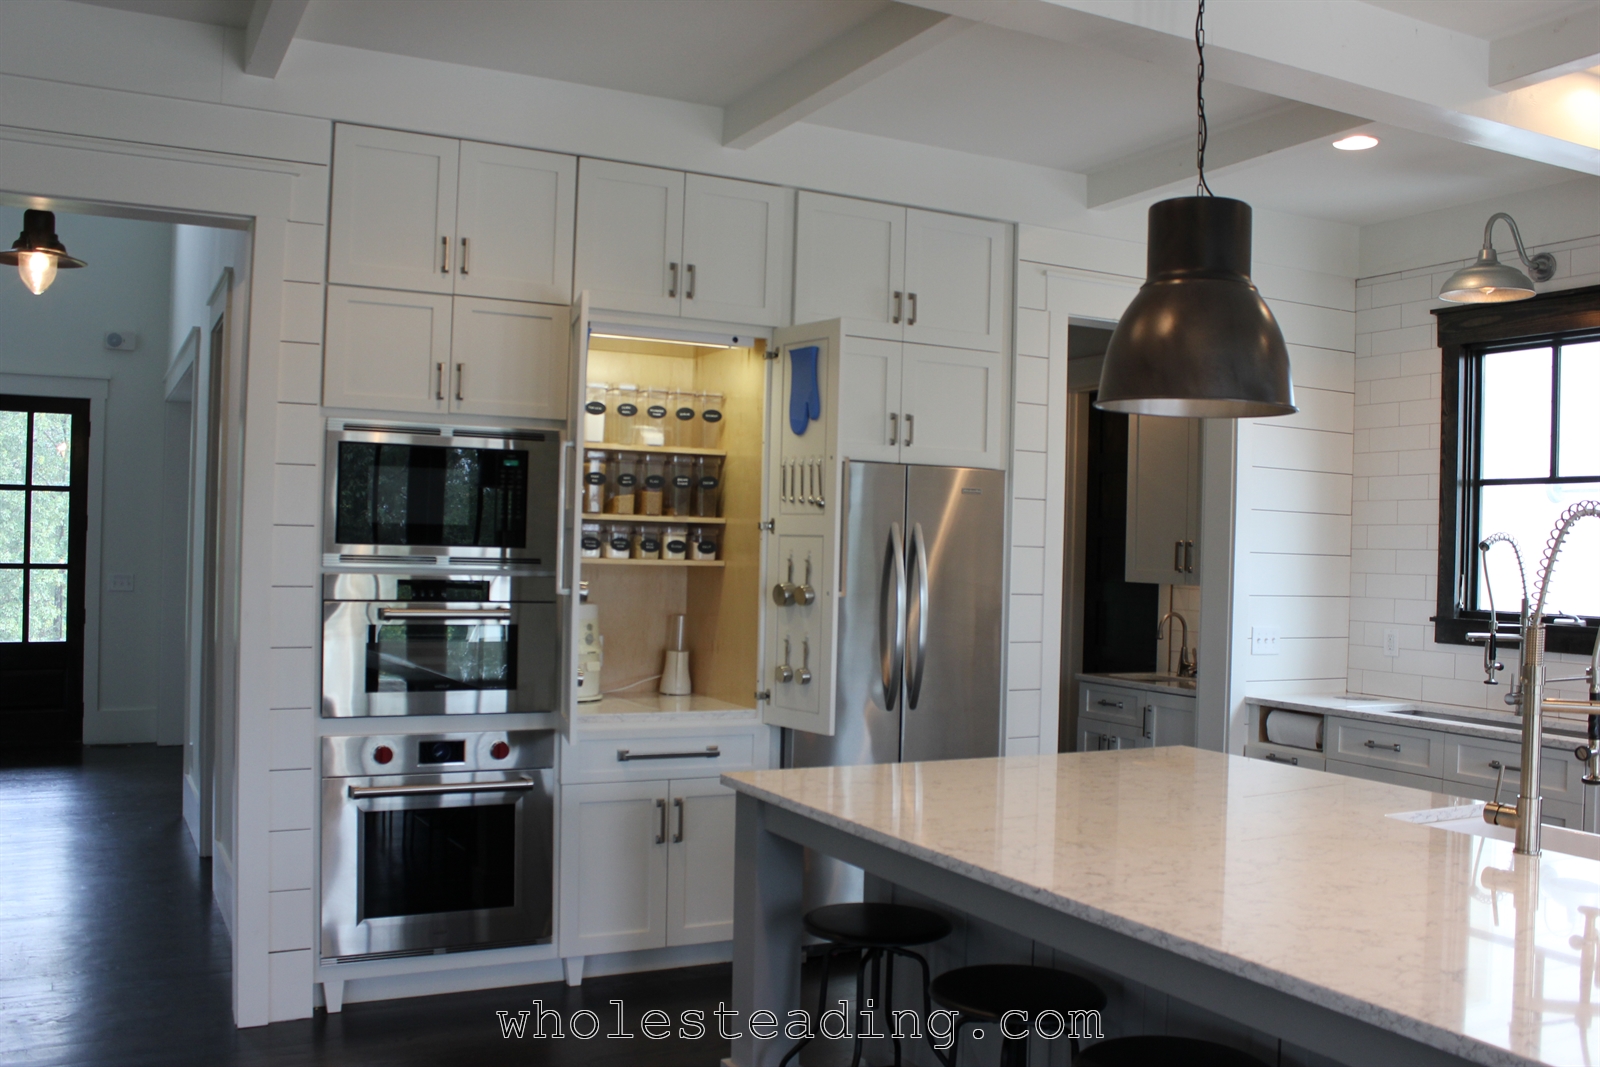
Organized Baking Station – This is actually something Bethany had in our previous kitchen…she just improved on the idea. The new baking station is hidden when the cabinets are closed and is consistent with the goal of a clutter-free counter-top area. The idea of the baking station is that she has all of her measuring cups, whole grains, baking ingredients, and baking spices within arms reach as she prepares recipes. Baking oils, honey, molasses, and specialty baking elements are stored in the cabinet below. The large countertop is directly behind her for rolling out dough, filling muffin tins, and scooping cookies. To make things even more convenient, the baking station has electrical outlets, bright lighting, and organized shelves and hooks:
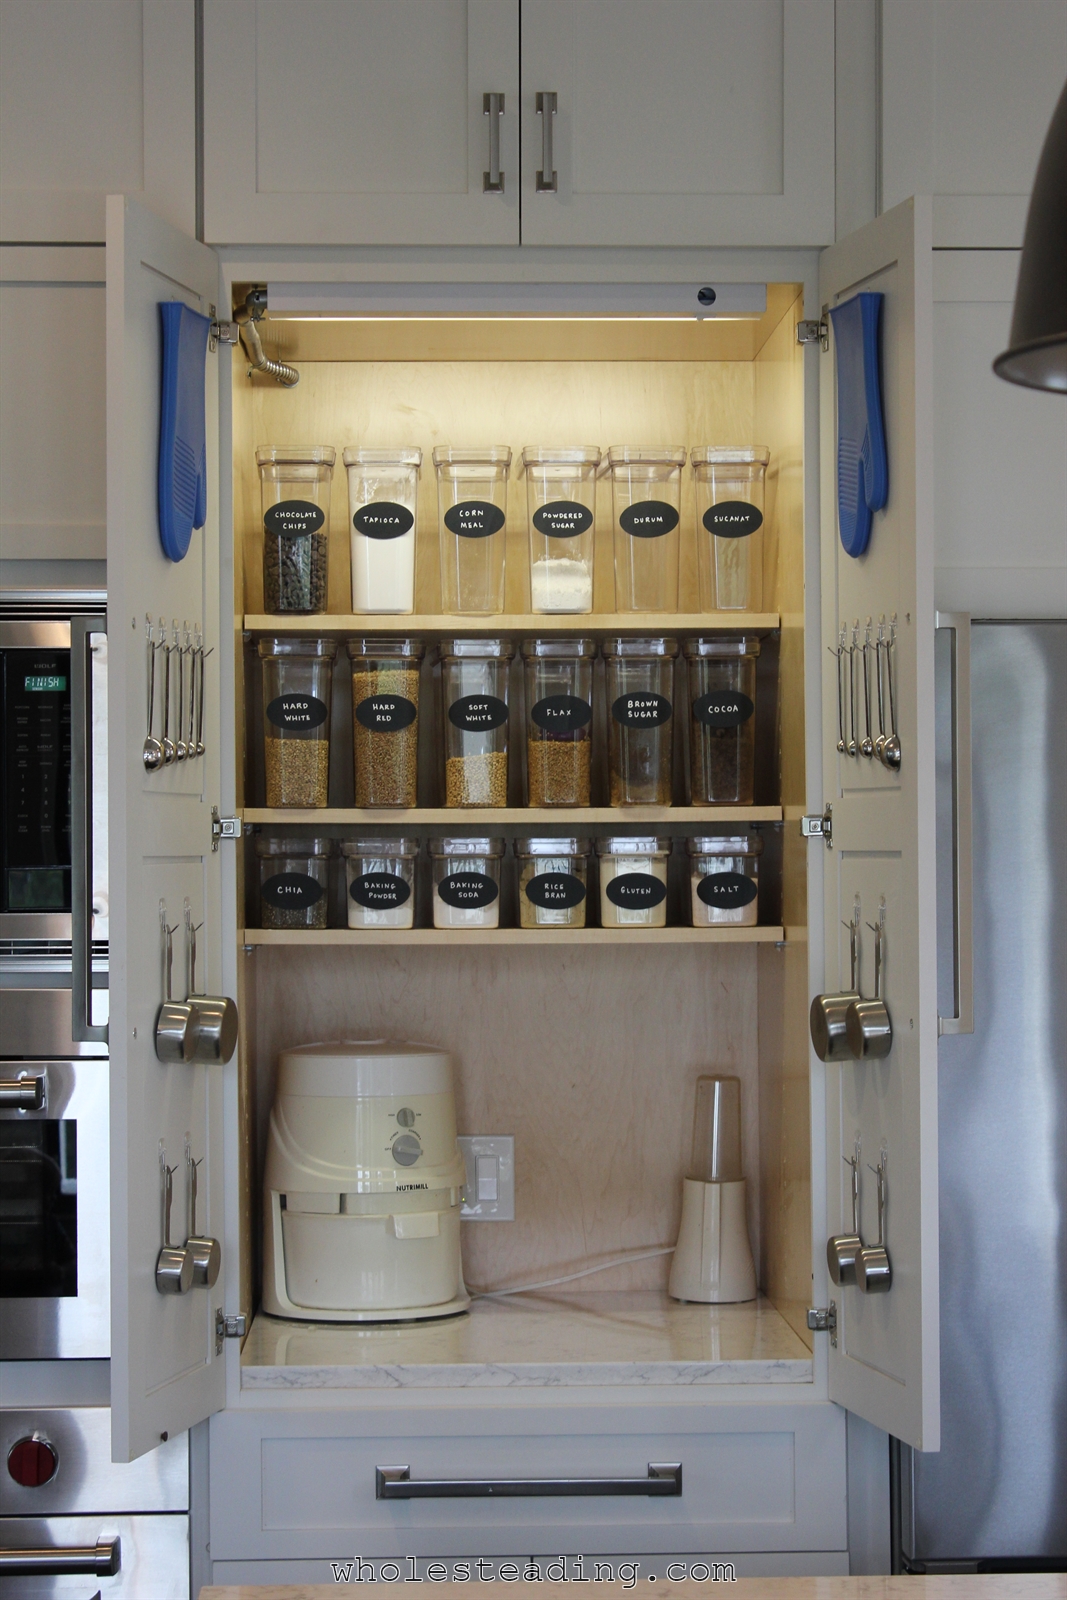
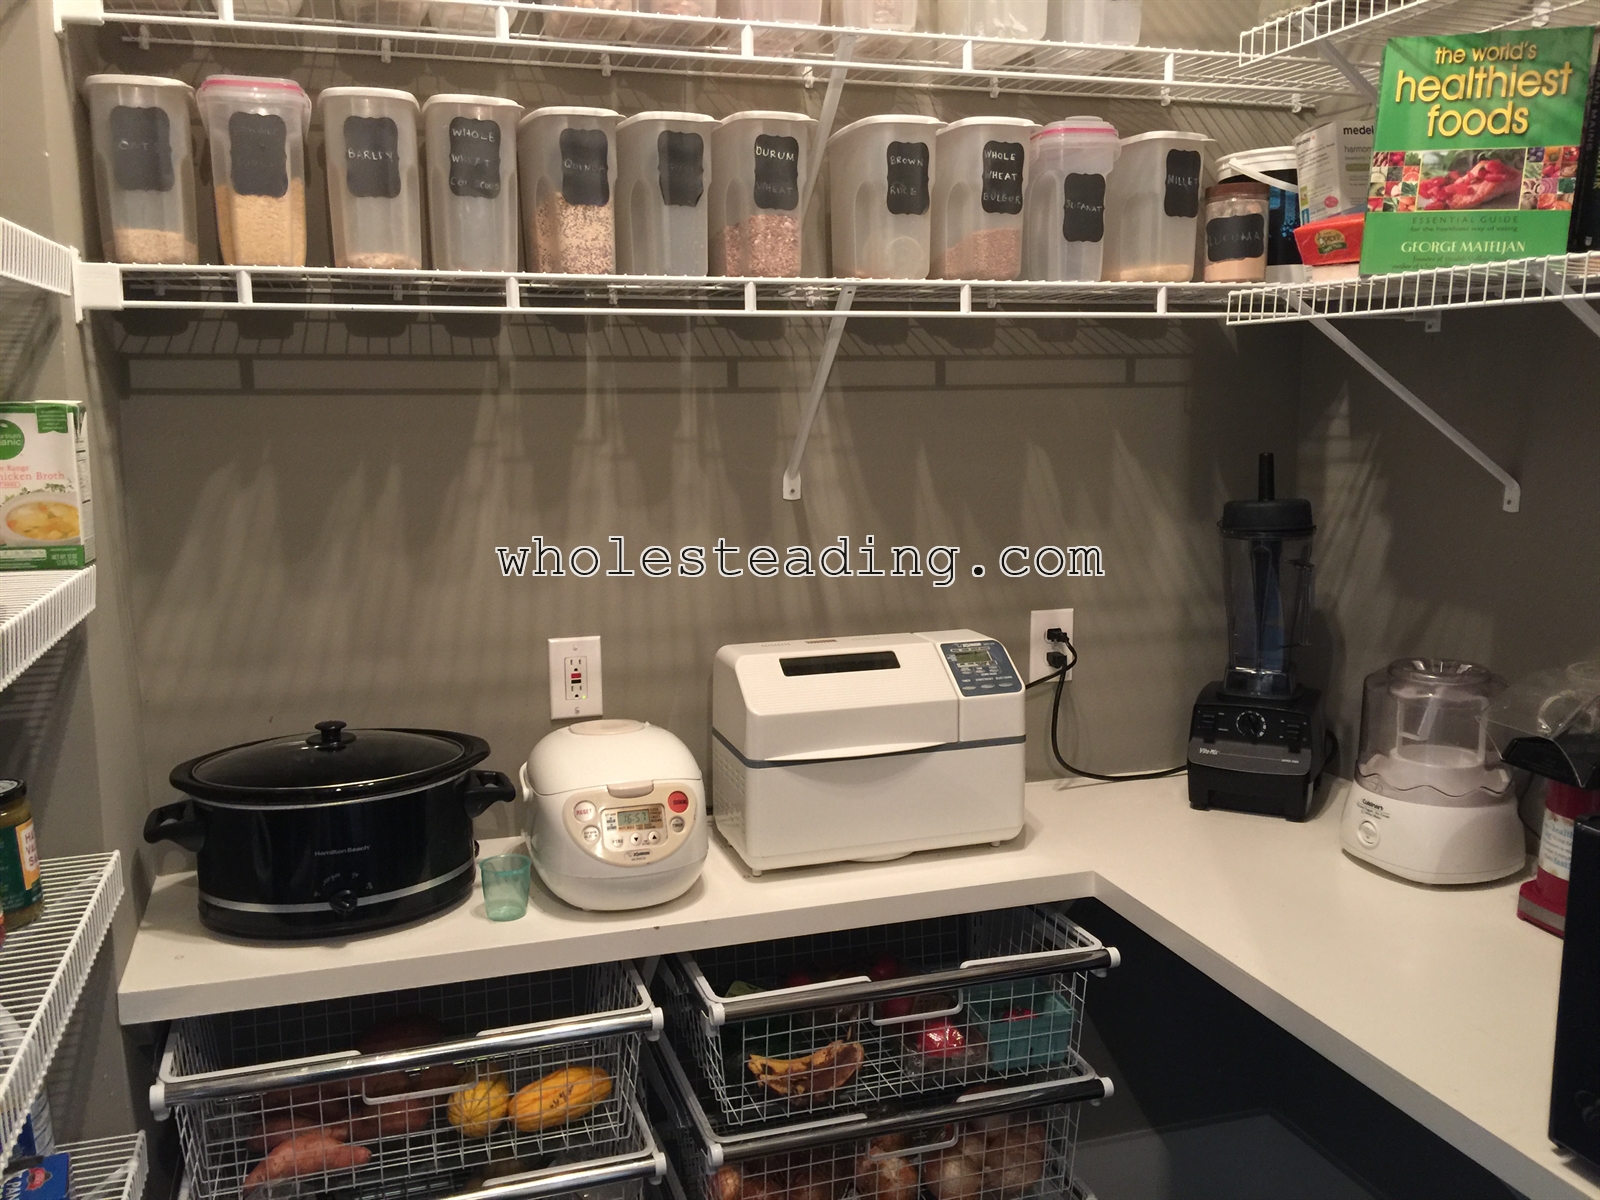
All of the grains are labeled and ready to go when Bethany bakes bread, cookies, muffins, etc. The Nutrimill and the Tribest Personal Blender are also plugged in and ready to go at all times so she can have a fresh loaf of bread baking in less than 5 minutes:
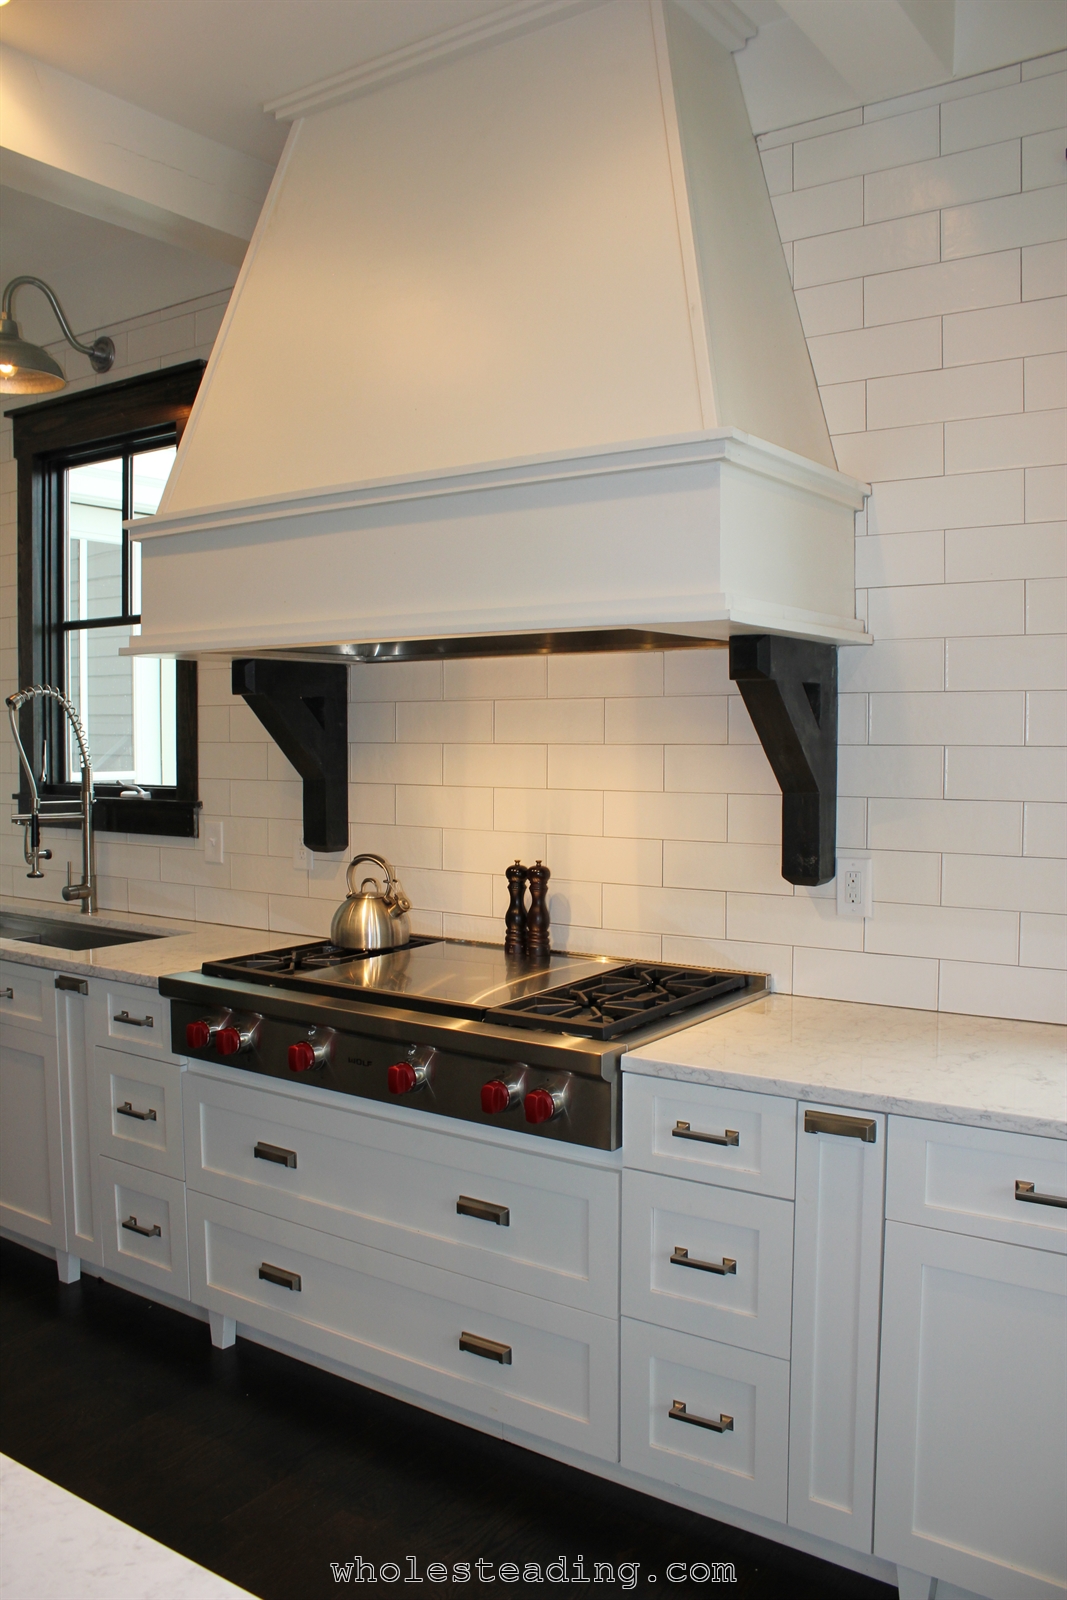
Quiet and Powerful Hood – Bethany was looking for a high-capacity hood that would be quiet and also provide good lighting and aesthetics. We decided to go with a custom built wood hood with a Ventahood insert:
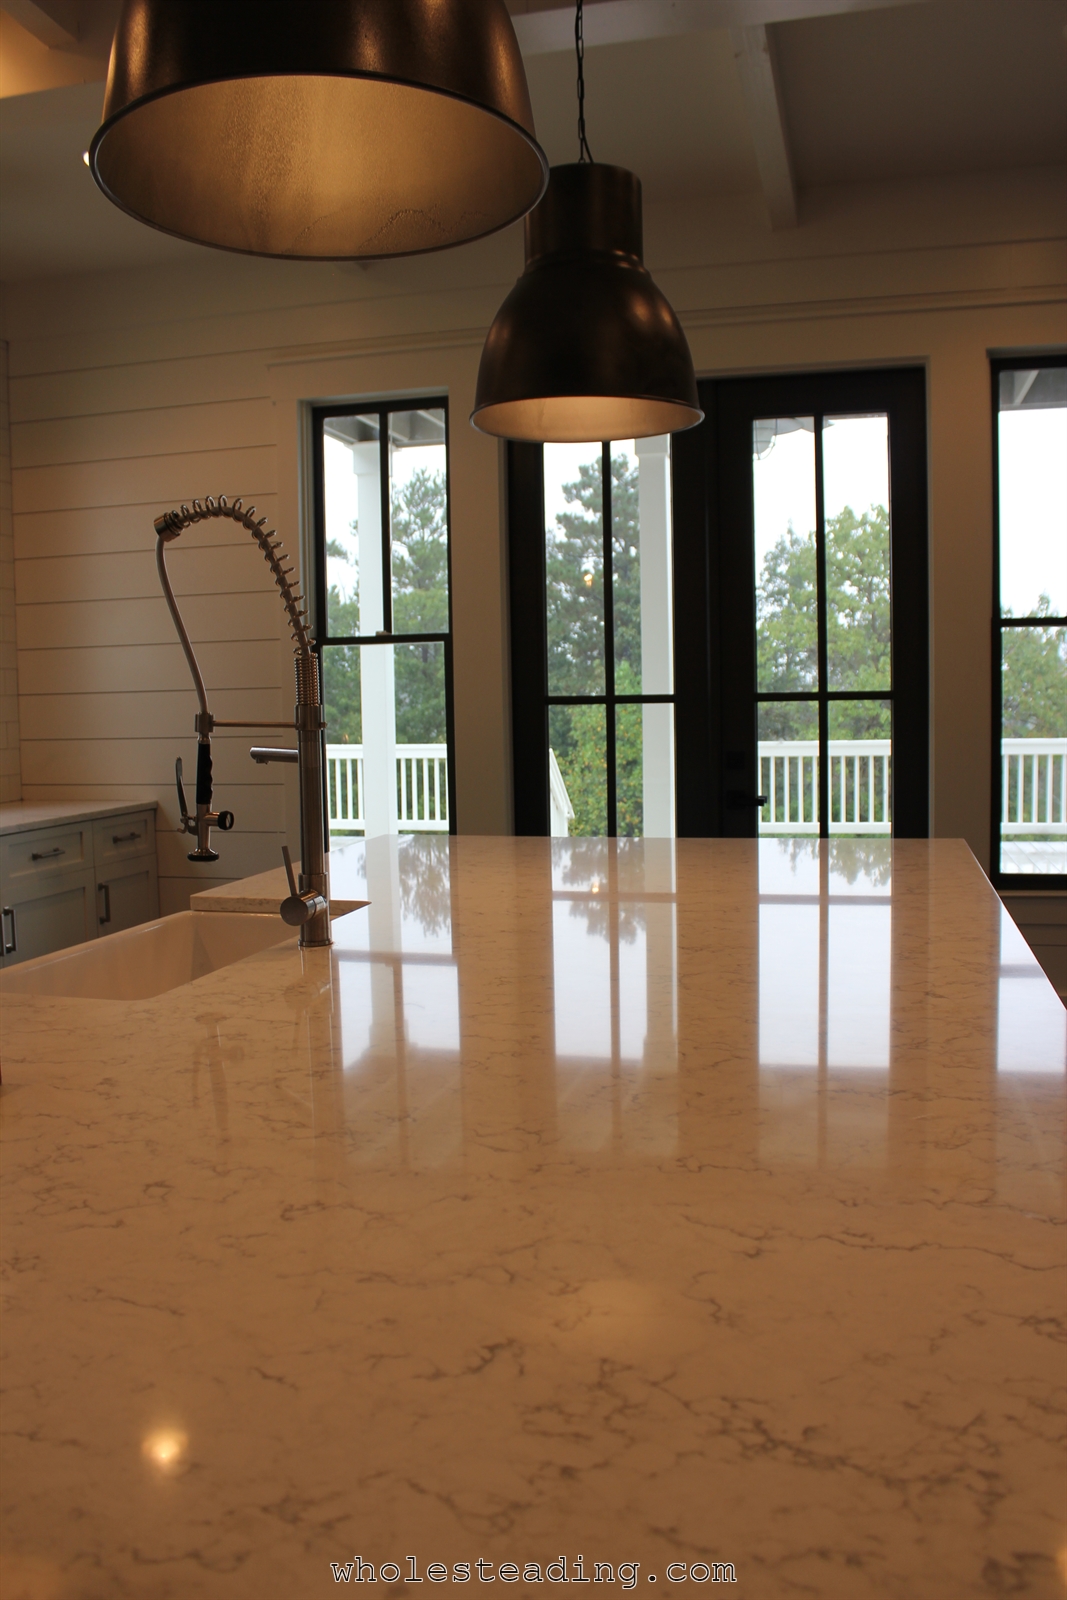
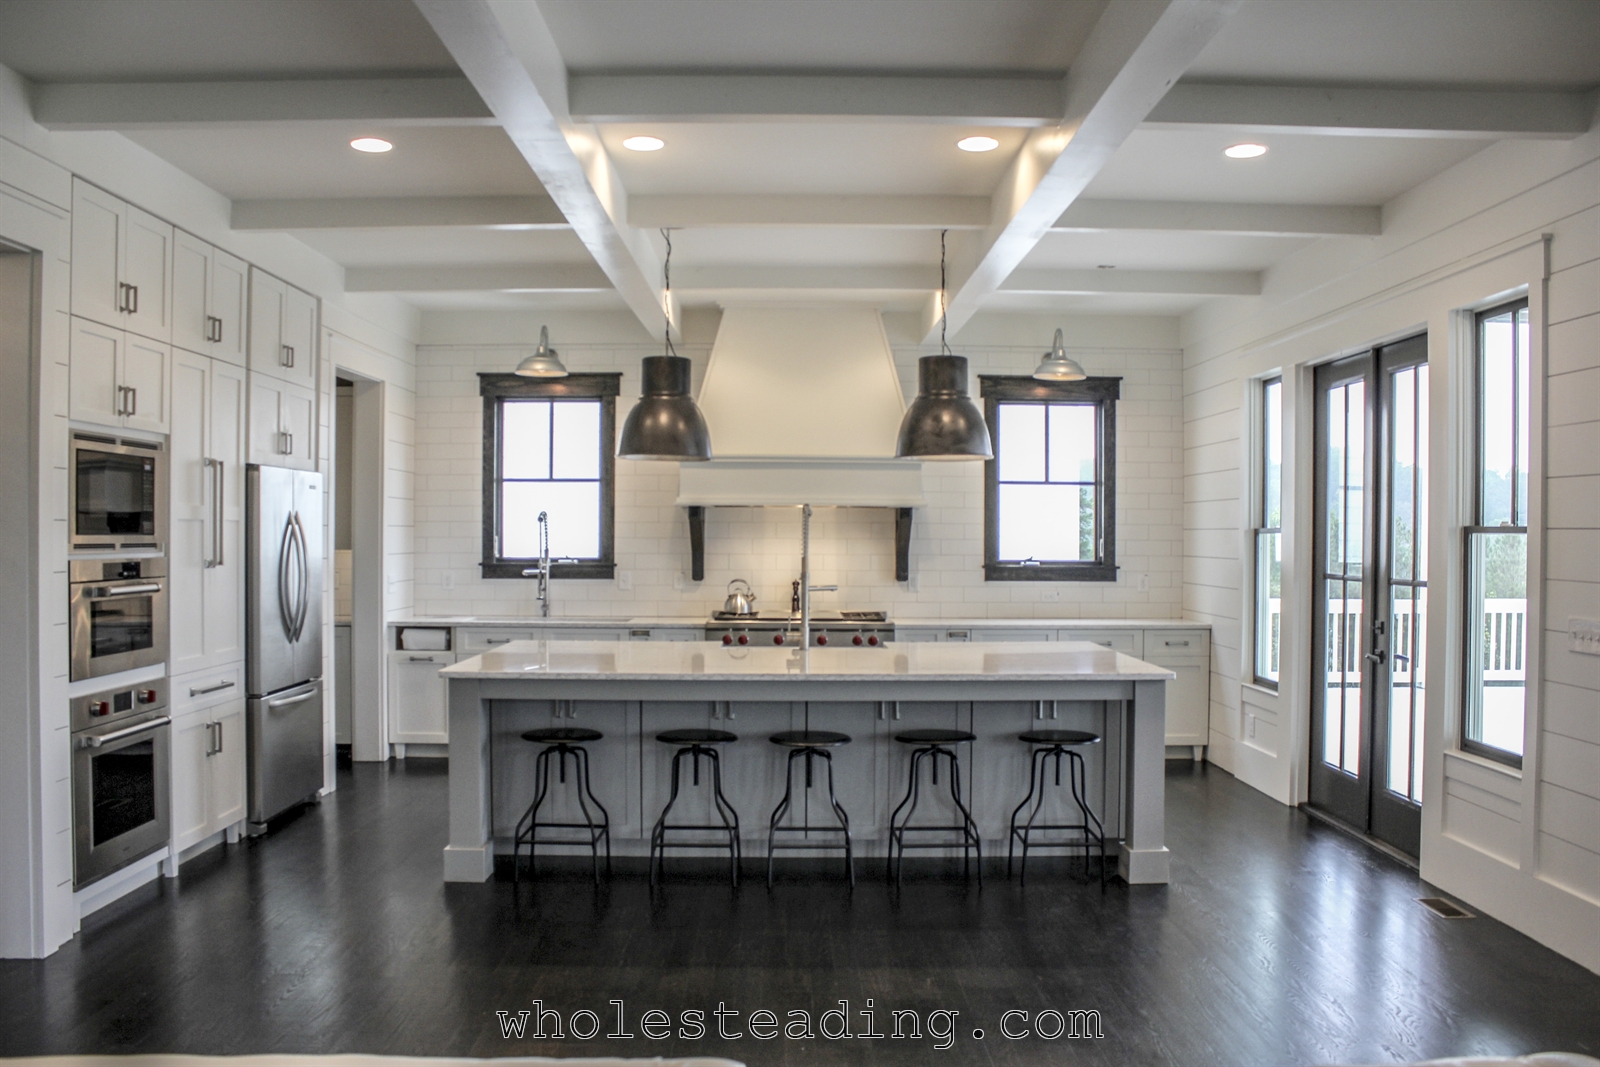
Large Spacious Island – Bethany likes to be able to spread out her work over a large area when she is cooking. She frequently bulk cooks large batches of recipes so she can stock up the freezer in the garage with delicious, easy-to-reheat meals. Having the counter-top space has been hugely appreciated:
Pull out trash can and Compost Hole – Over by the prep sink there is a pull out trash can that has two trash cans in it. The front one is for the trash and the rear one is for throwing in waste from the prep station that will make good compost. The prep scraps from the prep sink go directly into the compost hole in the countertop to the can below that catches it all. There is also a paper towel dispenser so that clean up in the prep area is as convenient as possible:
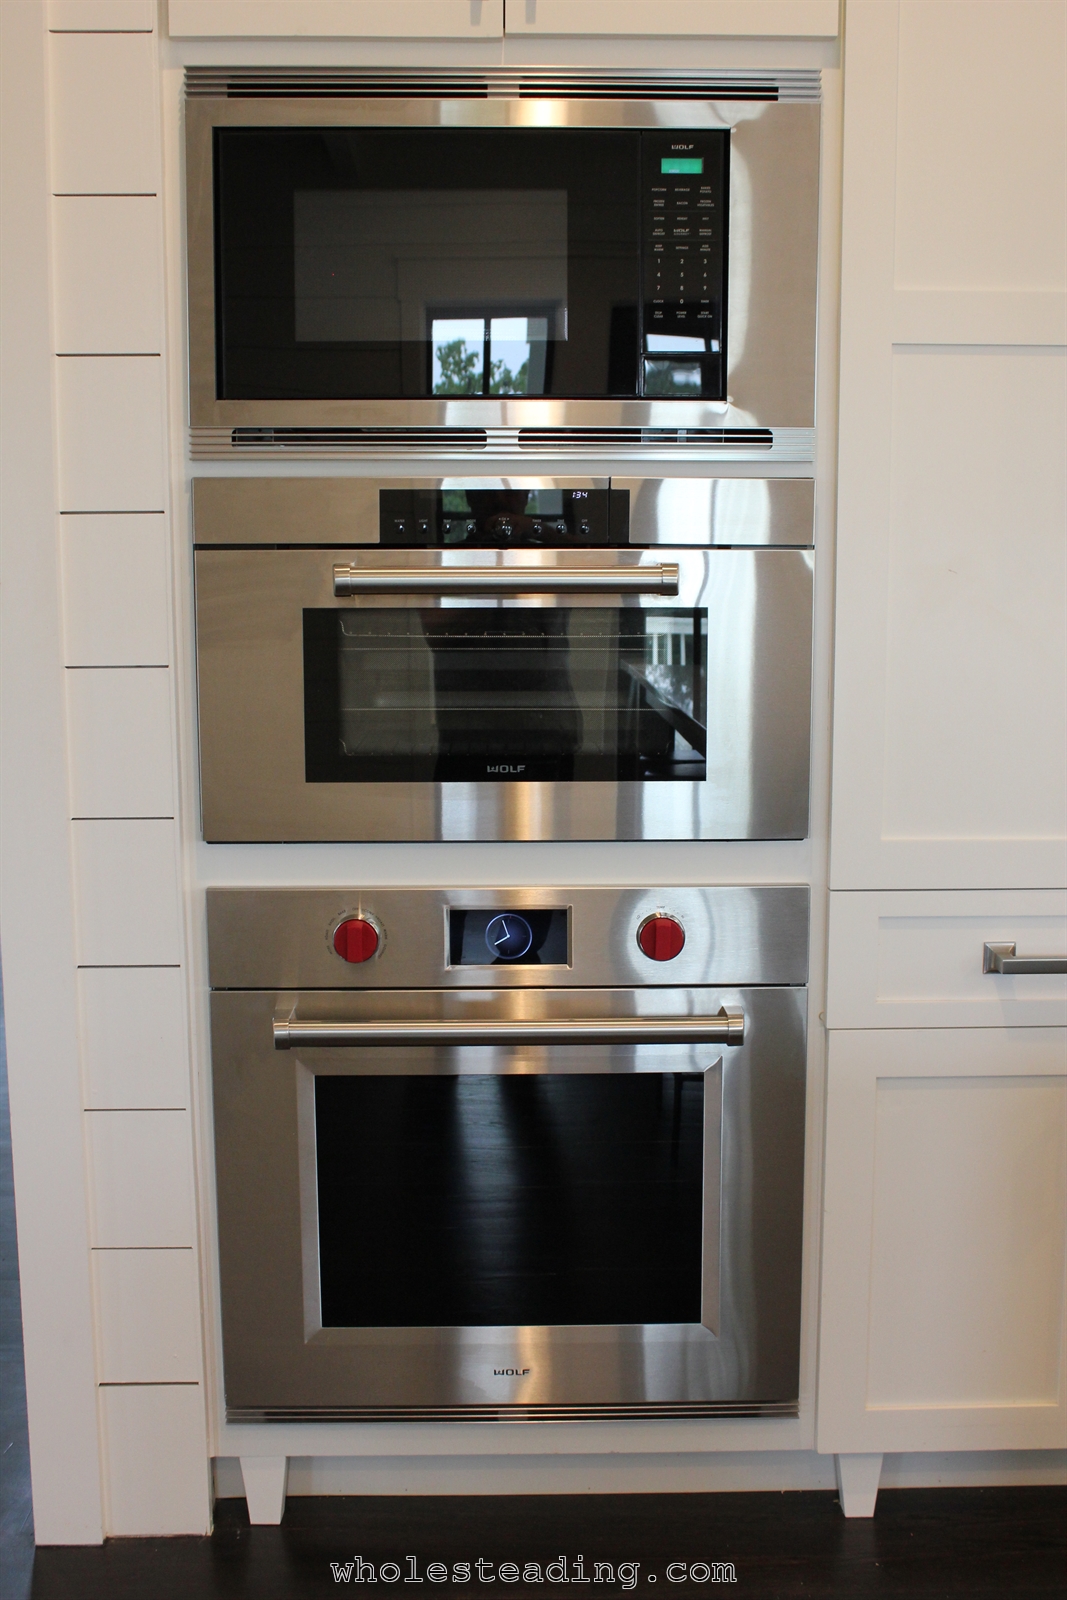
Steam Oven….oh, and other appliances too – Since we have moved in to the new house I can’t count the number of times Bethany has expressed gratitude for the steam oven. Bethany plans to do a separate post on just the steam oven so I won’t try to explain WHY she loves it so much in this post but just know…it is awesome! Here is the break down on the appliances we selected:
- Wolf 30 Inch M Series Professional Convection Steam Oven CSO30PM/S/PH
- Wolf 30 Inch M Series Professional Wall Oven SO30PM/S/PH
- Wolf 24 inch Standard Microwave MS24 w/30 inch M series Trim 824640
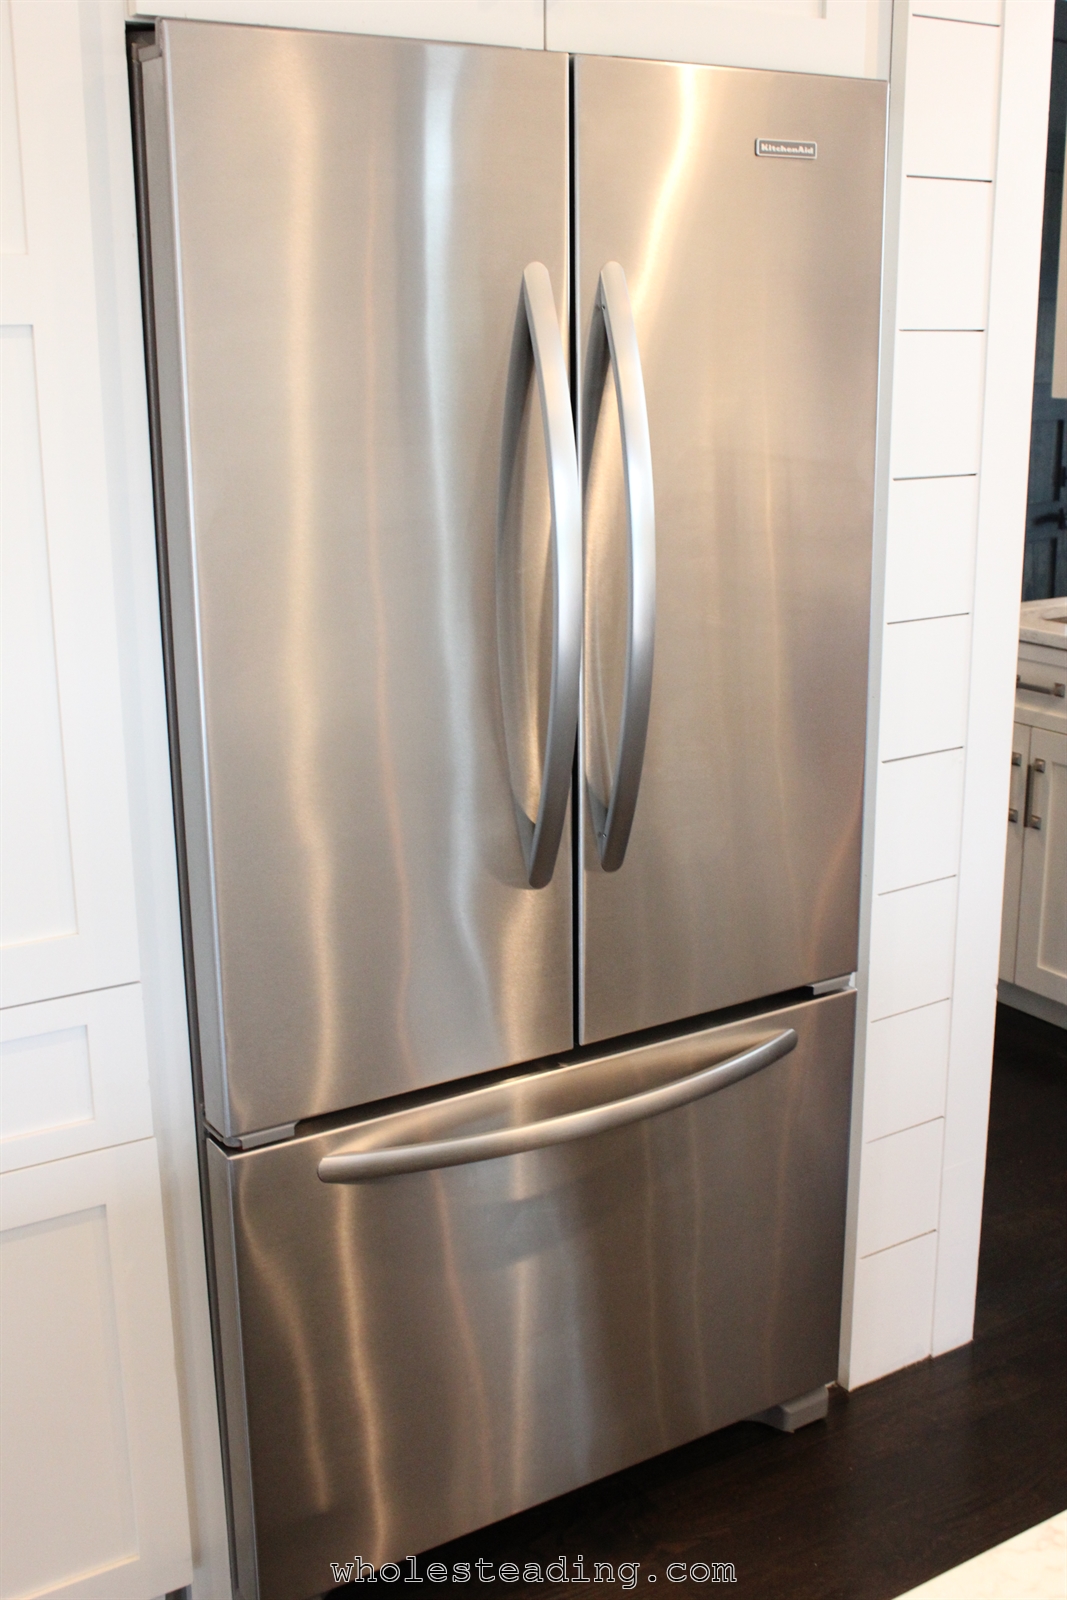
- 36 inch Kitchen Aid Refrigerator KFCS22EVMS
- Bosch 24 inch Panel Ready Dishwashers
- Wolf 48 inch range top with dual griddle
We are both extremely happy with the selections we made. We would have loved to go with the panel-ready Subzero fridge but for roughly $7,000 more we just couldn’t justify the extra cost. The Kitchen Aid fridge has a water dispenser inside the door and is organized extremely well on the inside. We had originally planned on the 60″ range top but it ate up too much cabinet and counter space, so we ended up going with the 48 inch model with the double griddle – a feature that was very important to us. The microwave is fantastic with features like “auto-reheat” that automatically senses when the food in the microwave is done reheating so you don’t even have to set a time…you just put the food in and push one button. Here are some close-up pictures of the main appliances:
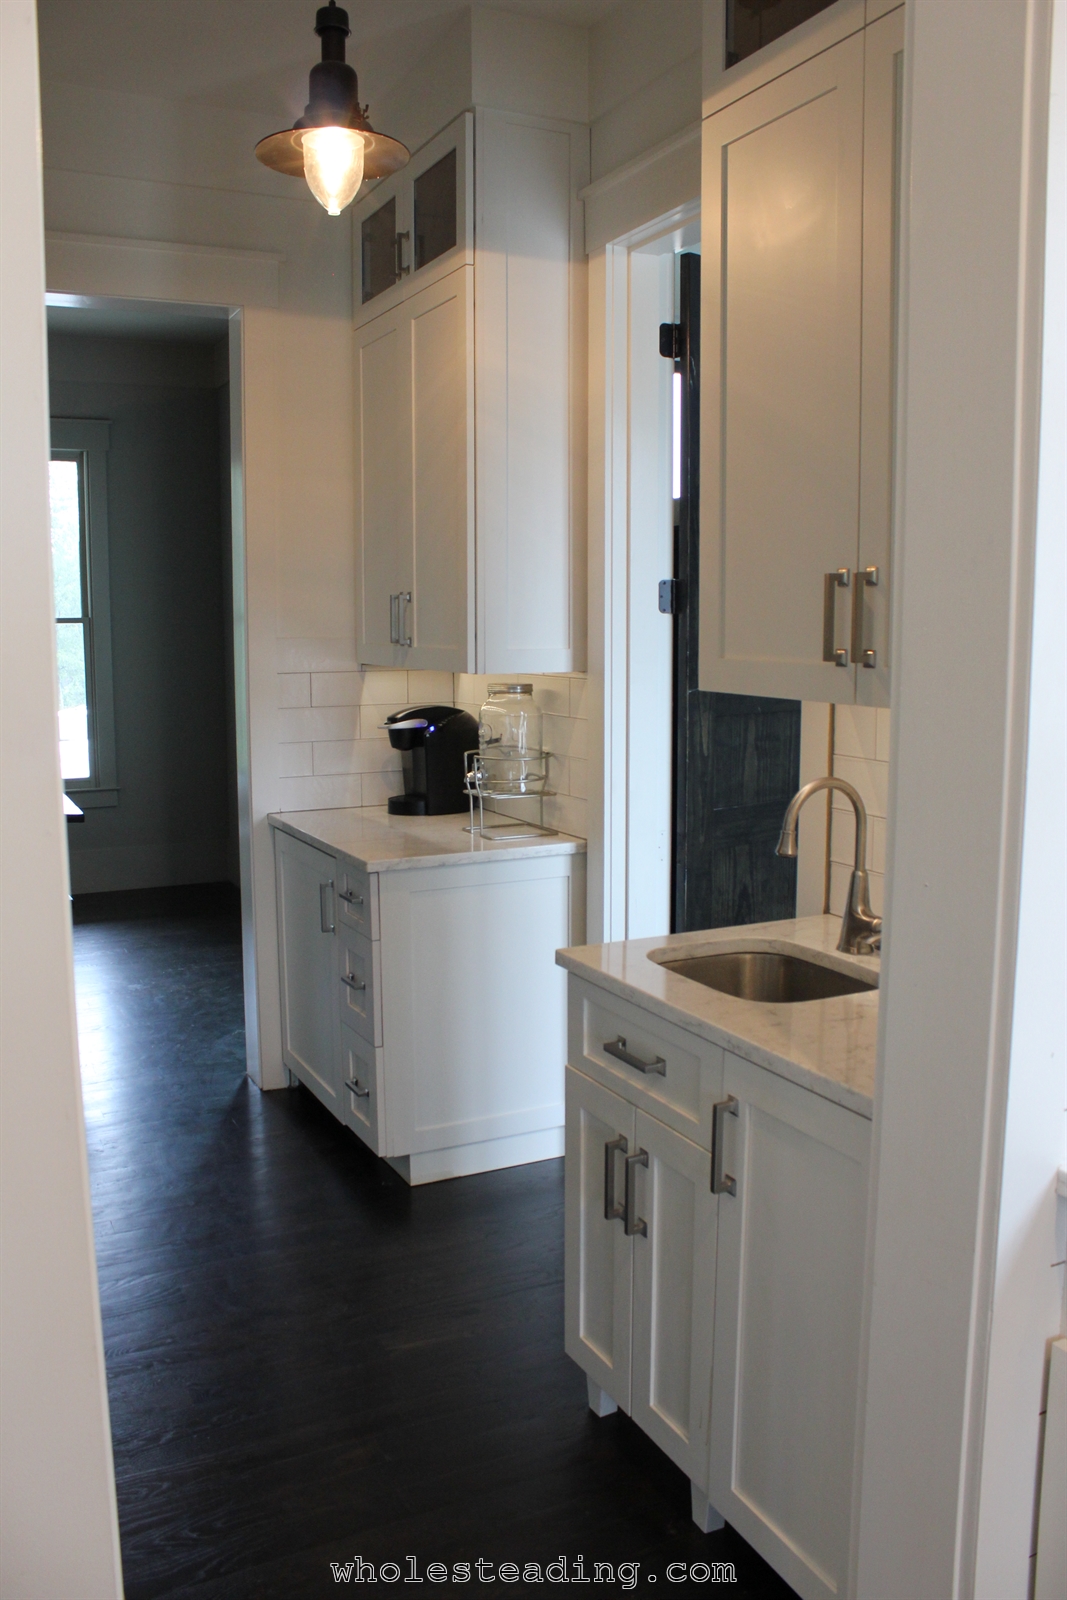
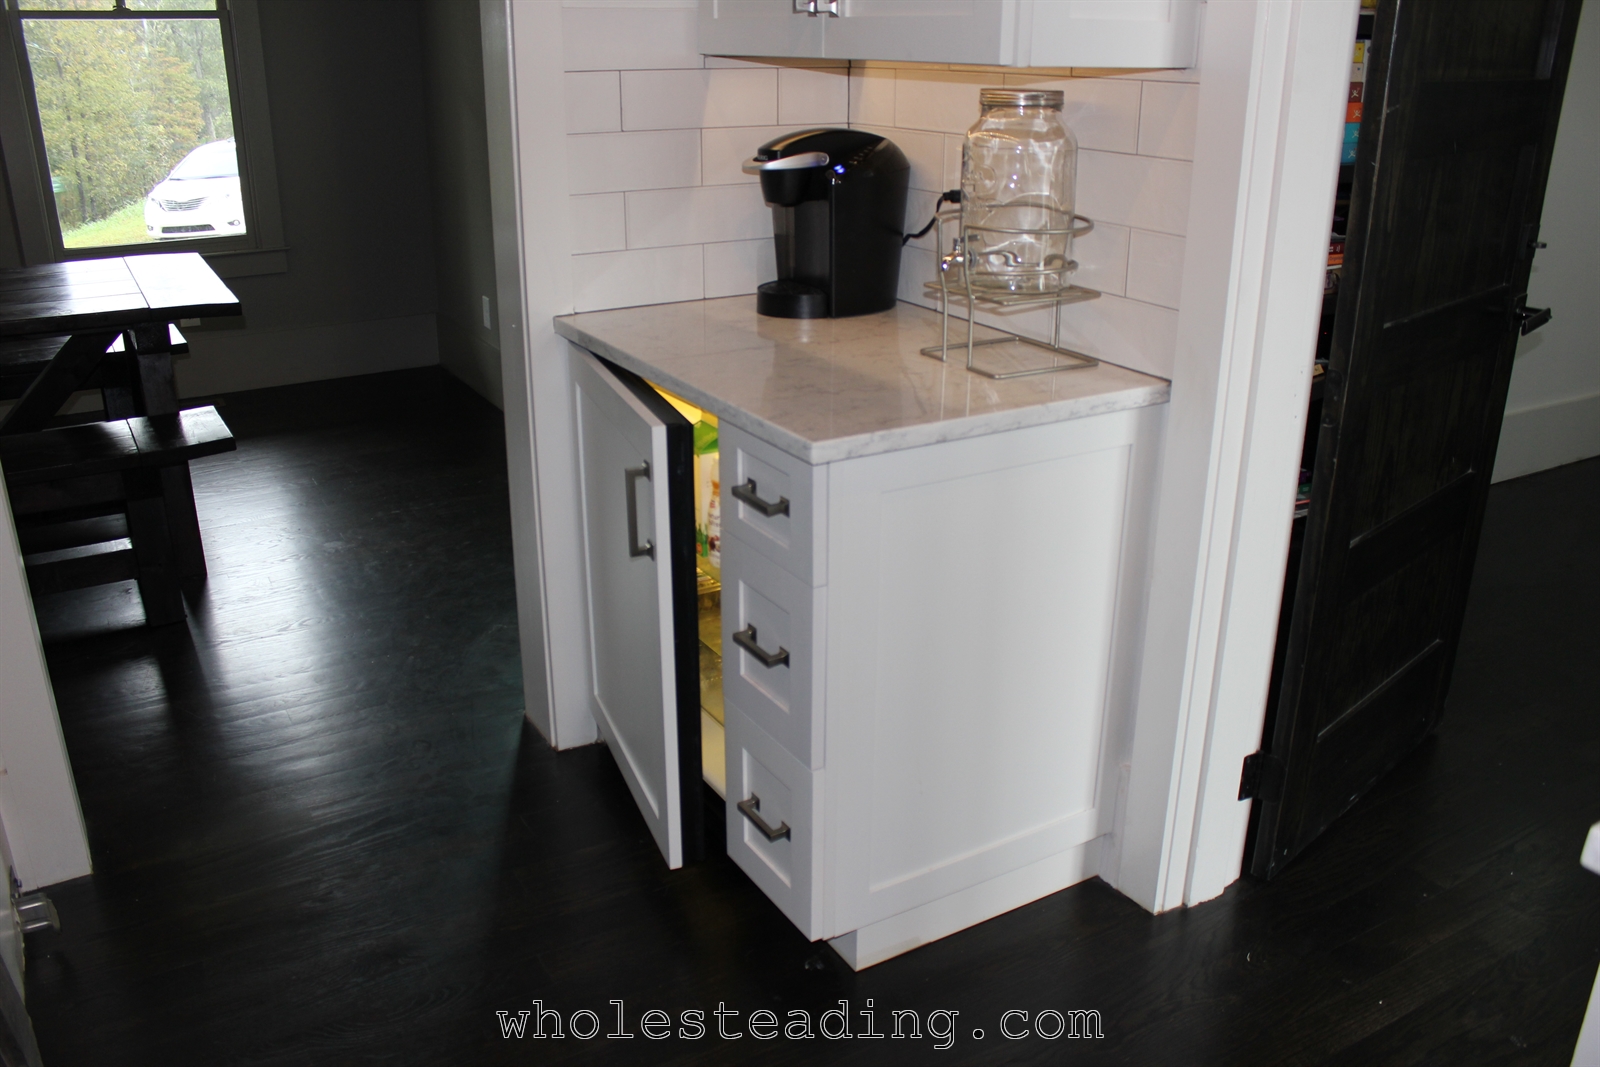
Beverage Center – One of the things Bethany had been planning on from the beginning was a “beverage center”. The beverage center is just outside of the main kitchen and is the place were all of the glasses and coffee cups, the Keurig coffee machine and ice machine, tea bags, beverage fridge, and all of the things related to beverages are found. There is an entrance door 1) to the mud room and to outside, 2) to the front dining room, 3) to the kitchen, and 4) to the pantry…one door on each side of the beverage center room. The idea is that the kids and guests can help themselves to a beverage without having to travel through the kitchen when Bethany and others are preparing a meal. The kids only have to step 3 feet into the house to grab a drink and then they can head right back outside with minimal dirt being spread throughout the house. Here are some pictures of the beverage center…let us know what you think of this idea by leaving a reply at the bottom of this post:

Butler’s Pantry with Plugged-in Appliances – Bethany wanted to keep the countertops clutter free – but she also didn’t want to have to find, retrieve, plug-in, and then store appliances every time she uses them. The solution was to add a counter-top area in the pantry with outlets (on different circuits) installed all along the counter-top. This allows the crockpot, rice cooker, bread machine, Vitamixer, popcorn maker, ice cream machine, and dehydrater to all be simultaneously plugged in and ready to go. Other appliances are stored by themselves on cabinet shelves in the kitchen, such as the waffle maker, but most small appliances are always plugged in and ready to go….not setting out on the main kitchen countertops. Here is a picture of the current appliance setup in the pantry:
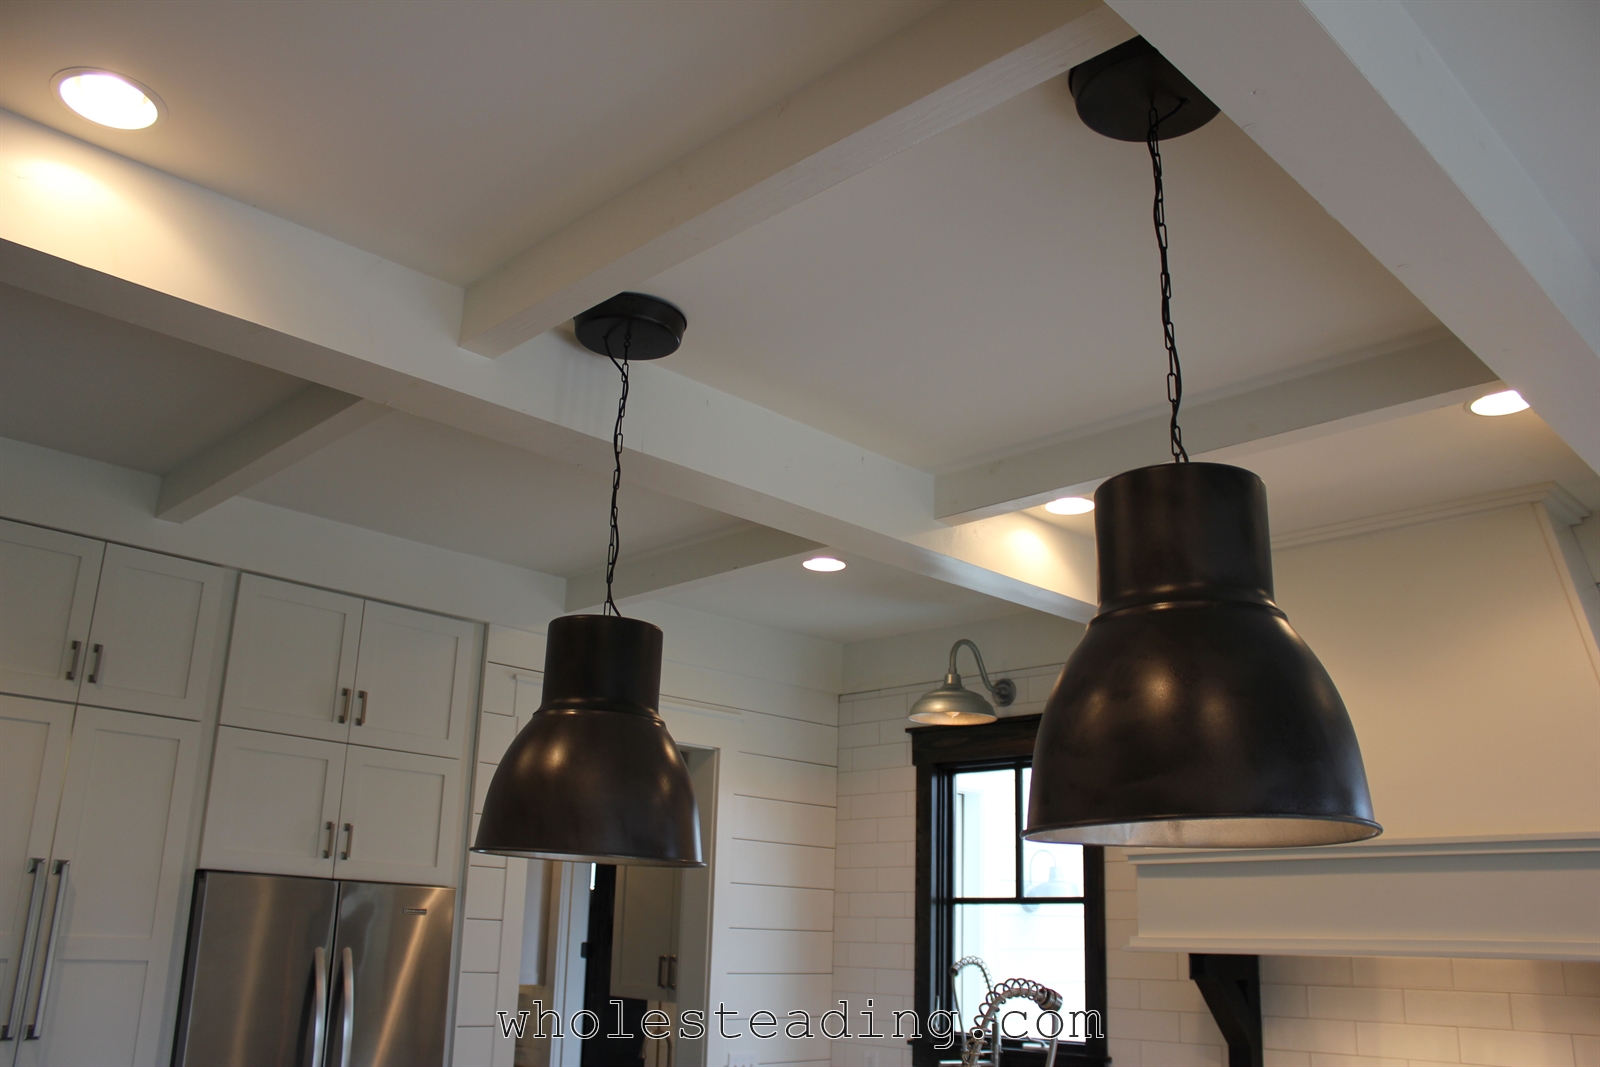
Sufficient Lighting – The kitchen in our last house had one florescent light bulb in the center of the kitchen. It was difficult to see the food and impossible to change the ambiance of the kitchen/dining area based on the situation. The new kitchen has 8 can lights, 2 accent lights above the windows, 2 large lights above the island, 3 lights in the hood, and under-cabinet lighting in the baking station and beverage center. These lights were surprisingly affordable and allow us to create the desired mood for a calm low-lighting evening snack or a bright high-production bulk cooking marathon. Part of what made this lighting affordable was creativity on Bethany’s part. For example, the large lights hanging above the island are from IKEA and cost only $59 each. She spray-painted them oil-rubbed bronze on the outside and pewter on the inside to match our decor. Here is a picture that shows the IKEA lights, the can lights, and the farmhouse style lights above the windows:
Well-thought-through Traffic Patterns – One last item I want to mention is the considerations Bethany put into thinking through the foot traffic patterns, the likely congestion points, and the distance that would have to be traveled to perform various food prep activities. We have been living in the house for a couple of months and it is obvious that the days of traffic jams in the kitchen are over. We have 10 people living in the house and it has been awesome to have so many people working in the kitchen at the same time without stepping on each others’ toes. While thinking through the traffic patterns, she also considered the lines of sight and natural lighting in the kitchen. Here are two pictures that demonstrate these elements of her design:
For those of you who are curious about other design elements:
Countertops: Viatera Minuet (installed by International Stone Design)
Island Color: Custom match to Restoration Hardware Graphite. Sherwin Williams has the color Pavestone which is also a very close match.
Perimeter Cabinets, Walls, and Ceiling Color: Sherwin Williams Alabaster
Floor: Red oak stained with Minwax Ebony and finished with matte polyurethane
Cabinet Hardware: Hickory Hardware Studio Collection
It comes in several finishes. We preferred the stainless steel finish, so we purchased ours from Home Depot.
If you live in the Atlanta area we highly recommend reaching out to Portico Properties for any new construction or renovation projects:
Custom Home Builder: Terence Lewis with Portico Properties
We would also like to thank some of the other key players that helped bring Bethany’s dream kitchen to life:
Project Managers: Josh Gentes and Roy Mallory with Portico Properties
Professional CADD Drawings: Josh Hardy with CADD Drafting Services
Custom Cabinets: Joe Gavalas and Blair Floyd with Marilynn Enterprises
Appliances: Donnie Richardson with Guy Gunter Home
Countertops: James Santos with ISD Kitchen and Bath Renovations
Central Vacuum: Brad McClarty with Mclarty Enterprises
I am sure that I missed some things, but hopefully this helps those of you considering a kitchen remodel or building a new house to come up with some great ideas that are both beautiful and functional.
If you enjoyed this post, please bless us by “Liking” our Facebook page: https://www.facebook.com/Wholesteading
If you really want to make us smile, SHARE this dream kitchen post with others on Pinterest or Facebook by clicking one of the “Share This” buttons below
PS – For those of you new to this site, you can see posts on all the steps of the entire process of building our custom farmhouse HERE.

I love the design and floorplan of your farmhouse and can`t wait to see more of it and hear more of your process! I keep coming back to study your floorplan because it has so many of the things we are looking for in our house planning project.
What a thoughtfully designed kitchen! I love it! (From the minimalist life)
We are building a home on our farm and I have LOVED reading through your build journey. Thank you for your detailed posts. Our plans are actually finished, stamped and engineered, but due to the cost and not being comfortable with the how big it has become, we are going back to the drawing board (SO painful after investing a year and way too much $ with design professionals). Anyhow, as I read about how you scrapped your plans and started over, everything you said resonated with me and has given me the confidence to take a second stab at this. And wow, if our end result is half as beautiful as yours, I will be a happy woman!
We’ve got our new concept plan (drafting construction docs this month!!), so I am visiting your kitchen post again as I work out the nitty-gritty on our kitchen plan. Marveling again at how well thought-out your kitchen is–flawless! Thank you for all the details. Curious what the final width ended up being on your island and if you find it too wide, just right, or could even stand to go wider (ours will be somewhere between 11-13′ long and 5-6′ wide…being a countertop hog, I love the going idea of 6′ wide, but I think that width might actually be counter-productive….pun intended! 😉
P.S. I still need to send you details on the geo-thermal greenhouse we’ll be putting in and the Mittleider Method of gardening that has knocked my socks off at my friends’ homes!